Saturday, April 7, 2012

Easter Eggs & Tulips


I had a fun Saturday!  I started off my day dying Easter eggs, actually I started this yesterday afternoon.  I tried my hand at the Dino Egg technique for the first dozen.  

I began by hard boiling seven eggs.  I like working in small batches, but you can certain cook all your eggs at once.  While the eggs were cooking I mixed up my dyes.  I used mugs, and measured out 1/2 cup of water, tablespoons of vinegar, and around 20 drops of food coloring.  After the eggs finished cooking, I cooled them in a bowl of cold water with some ice cubes.  I did this to cool the eggs so I could handle them with my hands.  Then I gentle tapped each egg on the counter to create cracks all over the egg.  I found it was easiest to tap the egg on a hard surface to begin, and then gently pressed my finger into the shell to crack the rest of the surface.  

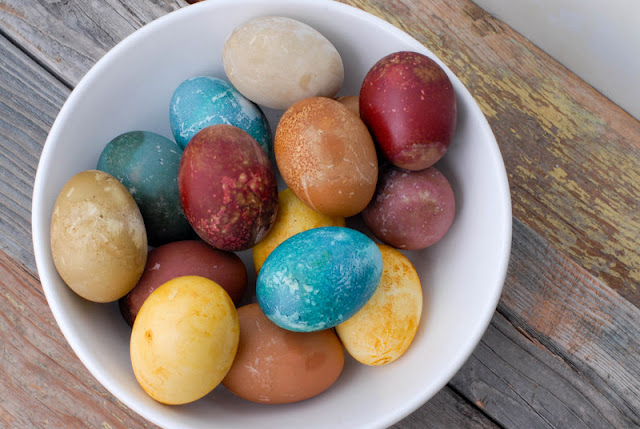
The yellow eggs I used plain yellow drops.  The lighter egg in the front soaked for half the day, and the darker yellow egg in the back sat overnight.  Any of the eggs you can see the cracks on only sat in the dye for two to three hours.  The two blue in the front are just blue dye.  The pair above them are both blue and green dye, more blue than green.  The three green in a column are different variations of green and blue dye together, with more green than blue.  The fourth egg to this group will appear later.  The pair two in from the end were made from the same dye as the last two, but the back one I added more blue dye to, and the bottom egg I added more red dye.  

I was really pleased with how this photo turned out.  Long metal teaspoons are the best utensil for this activity.  Plus, it's usually the only spoon we have enough clean to use a different one for each mug, and I don't feel guilty dirtying that many teaspoons.  :)

This is what one egg looked like when peeled.  Not as perfect as Our First Bites', but I'm still please with the results.  I think I said this recently about another DIY I posted ...

I had grand expectations of attempting to make some of my own dyes out of natural ingredients.  To begin I already had some food dye handy, and the only natural thing I could use at home was either coffee or turmeric.  Poo.  I didn't really want brown and mustard colored eggs for easter.   Maybe I'll try it out on some other less pastel oriented day.  I didn't really want to run out to buy a few beets, red onions, or cabbage to get fun colors.  I think I'll save this natural dye idea for when it's nicer out, and there are more things I can pick from the yard to use as dye.  Actually I did that for my science project in 9th grade.   I made a three fold display board showing all the swatches of fabric I had dyed with different things I found around the house and yard.  That was a great project, wish digital camera existed back then, and we had gotten a snap shot of it!  

After my egg dying fun, I went to this great botanical garden just over the border in PA called Longwood Gardens.  I went to take photos of one of my brothers and his fiance.  They recently got engaged, and I offered to take a few photos of them together.  I've never taken this type of portrait before, and I had a ton of fun.  Though, I did have some jitters before heading out.  I think I got some good photos of them.  I hope they like them!  E!  After we were done taking cute couple photos, they went on there way, and Aaron and I stayed, and walked the grounds a bit.  

The place was crawling with tourist checking out the tulip display.  


I think we were a few days late though, they kind of looked sad when you looked at them up-close individually.  It was hard to find a good patch for a pretty picture or two.  


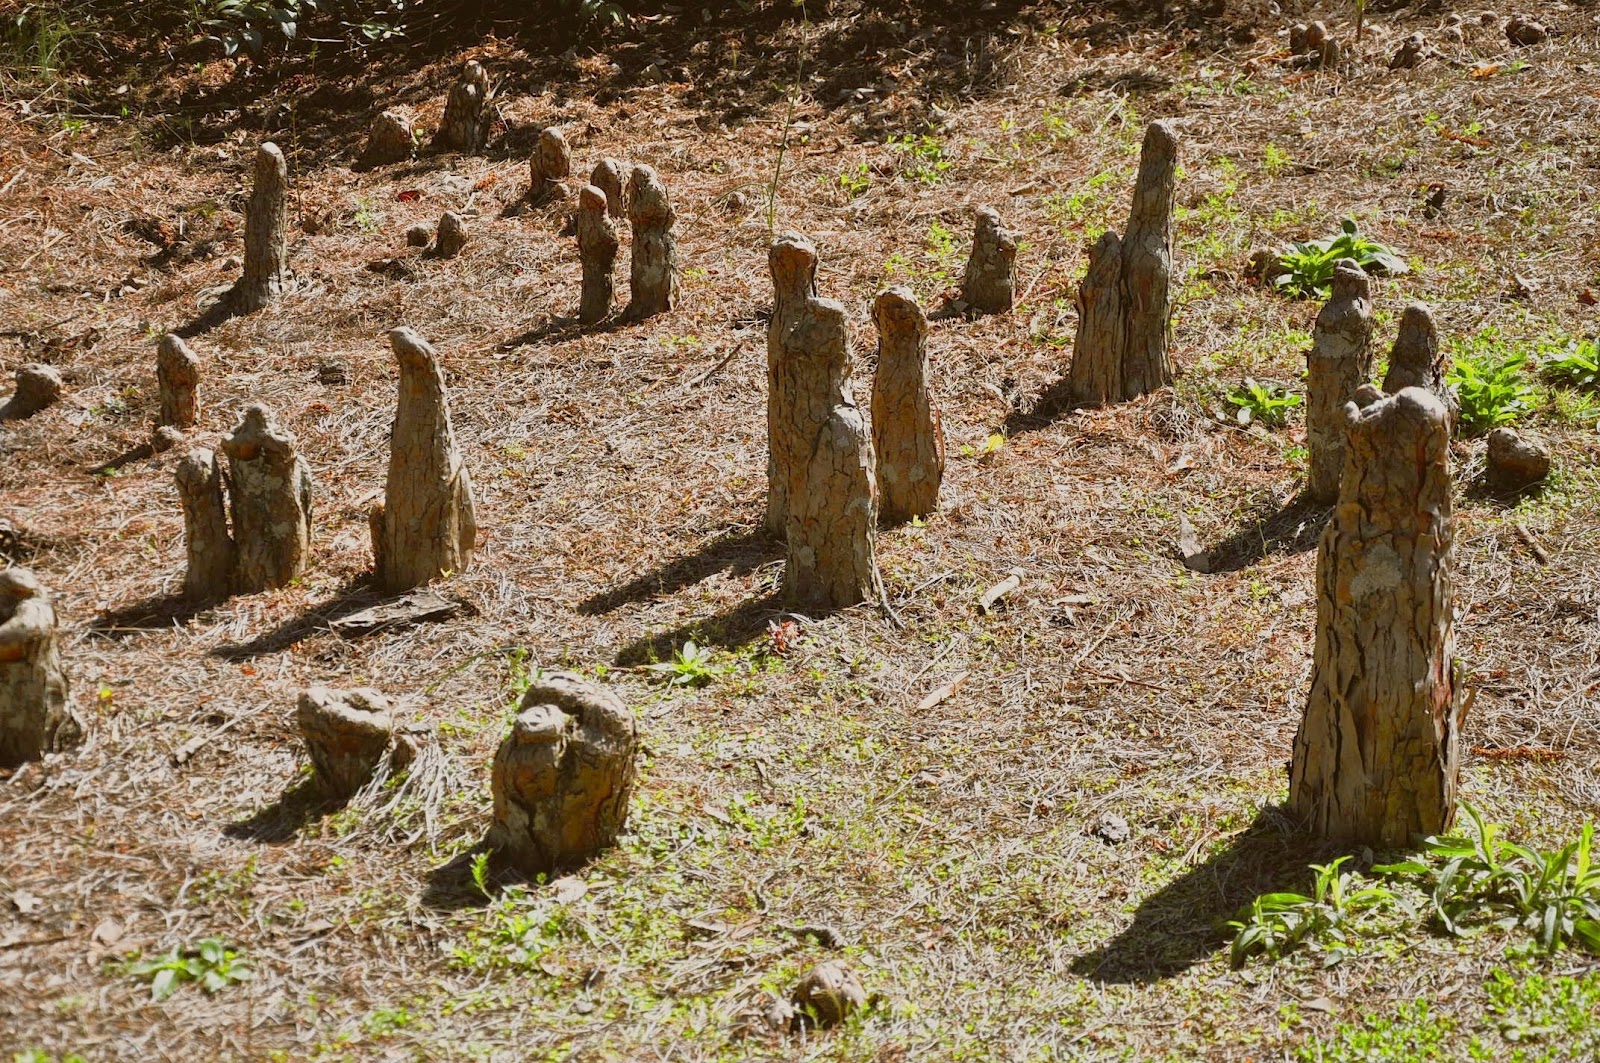
If you're awesome you might know what these are. Or maybe you've never been so blessed to have come across these magical nubs.  They are called bald cypress knees, they are part of the tree's root structure!  I think they are super awesome.  Can't you imagine a gnome living inside of a knee, or a unicorn resting here to drink some water?  Bald cypress trees need water to thrive, they mostly live in swamps or wetlands.  Delaware is the furthest north they grow naturally in large stands.    

Hope ya'll have a great holiday weekend, whatever holiday you celebrate!  Happy DIYing, chris.

Friday, April 6, 2012

Second Go At Friday Finds


Since it's a holiday weekend, I decided to take a break from my One Year Wedding Anniversary Series.  Well, I'm not Catholic, and I don't do much to celebrate Easter.  We go to my Grandparents' for a family meal on Sunday.  That's it, but I can't pass up an excuse to make a mess dying some hard boiled eggs, and then put on a cute dress and eat yummy sweet things.  I enjoyed posting my Friday Finds last week, and I love seeing what Elycia and Kaylah are finding each week.  Maybe this is an addition that will stick.  :)  Though, I hate to feel like a copy-cat!  I'll just have to get over that, cause I'm delighted with this new acquisition.  

I found these lovely eggs on Boulder Locavore via craftgawker.  I love the idea of using natural kitchen ingredients to dye my easter eggs.  Thrifty and convenient, this is a DIY with my name written all over it! 

Dino Eggs!  I'm a huge fan of dinosaurs.  This egg dying tutorial is pretty similar to how you already dye your Easter eggs, with one simple extra step to get the dino effect.  You don't need any special materials or skills to get these awesome results!  Our Best Bites has a never ending supply of great ideas, they are definitely on my BlogLovin' list.  

Here is a tasty treat for the holiday from Lemon Basil.  Is it just me, or do you associate carrot cake with Easter too?  Aaron doesn't like carrot cake, so I probably wont be making these, as tasty as they look.  

I love this dress from Ruche!  If I was a church goer, I would love to be sporting this lovely number on Sunday.  I'm sure the compliments would keep rolling in.  :)

This hair piece would be the perfect accessory to go with the Come Sail Away Print dress above.  Plus I already own these!  I treated myself to them for our wedding.  I know I could make these, but I like supporting other talented independent crafters like Handle & Spout.  

Have a great weekend, and Happy Good Friday and DIYing, chris!  

Thursday, April 5, 2012

Wedding Stationary


To continue my One Year Anniversary Series here are the save the date and wedding invitations I made up for our special day.  

I made the envelopes out of scrapbook paper, which I got on sale from Michael's.  I have a DIY tutorial on how to make envelopes here, and I used a similar technique for my save the dates.  For the actual save the dates, I had previously made a bunch of post cards out of old wallpaper and 4x5 index cards, and they were just sitting in a box, so I used them for our wedding.  It was great to save money here.  We spent more on postage for these than on the actual save the dates!  To customize the cards I printed our save the date message on them, and then modge podged some tissue flowers from vintage napkins I'd been saving.  

To write the recipients' name and addresses on the front, I carefully placed blank address labels, and then hand addressed them all.  I loved finding a purpose for the 4x5 postcards I made.  This was the perfect match, because I received this paper during our summer at Idyllwild from my friend Rachel.  She had to clean out the painting teacher's supply closet, and there was a slew of wallpaper sample books from the 70's.  She gave me some, and I was thrilled.  I cherish vintage paper.  


For our wedding invites we used two different packaged DIY invites from Michael's wedding selection.  I loved the colors and design of both of these.  They were simple to use, and on sale!  I'm glad I went this route for my invites.  I think if I tried more of a handmade approach than these, I would have spent even more money and time on these then I did.  I'm certain there are not cheaper options as far as store bought goes.  Weddings are so expensive, and I didn't see the need to spend a ton of money on something most people will throw away.  Sure the invites set the mood for the wedding, but there is no need to spend hundreds of dollars on all the wedding stationary.  Most people will barely remember what the invites looked like by the date of the wedding anyway!  

That's all for today.  Hope ya'll enjoyed, happy DIYing, chris!  

Wednesday, April 4, 2012

How We Met

To kick off my posts gearing up for my One Year Wedding Anniversary I wanted to share how Aaron and I meet.  

I first laid eyes on this cutie when I was pulling up to Idyllwild Arts Summer Camp, in California with my buddy Rachel & her brother in June of 2006.  Rachel and I both graduated Bennington College together, and met up at her twin brothers' place in Hollywood to drive up to our summer jobs at this camp in Idyllwild, CA.  Rachel was the painting teacher's assistant, and I was the camp photographer.  We had a blast that summer, Idyllwild is a magical place.  

Aaron and this guy (above: his buddy Derick) were the first people I saw at the camp, and I knew we would make fast friends.  Aaron and Derick both worked as theater technicians.  Derick is an amazing dude.  He was the best man at our wedding.  

This is us washing dishes at Aaron's camp housing.  I had a room with two other girls on campus, so it was nice to retreat to his house off campus.  He shared the house with two other dudes, one of them was Derick.  

This is another picture of us at the house.  It was western wear night.  Aaron bought that shirt up in Idyllwild that summer, and it's still one of his favorites.  


This group of photos is from my parent's visit to California, and first meeting Aaron.  We went to the San Diego Zoo, and I learned that meerkats are one of Aaron's favorite animals.  How can a girl resist a man that loves western wear and meerkats?  


This group of photos are from a hike I went on while at the camp.  Idyllwild is a beautiful place.  There are trees there that the bark smells like bubblegum!  I'm not making this up, you want to lick the tree trunks.    

One last photo, this is from the beach we lived two blocks from in Long Beach, California.  This is were our first apartment was, it was wonderful living so close to the beach.  Even if it was a nasty trash infested polluted stinky beach.  :)  That's Long Beach for you!  

Hope you enjoyed our little story.   Happy DIYing, chris!  

Tuesday, April 3, 2012

March in Numbers

March in Numbers

I loved March's handmade calendar.  That dang elephant pair is too darn cute!  Our special days I marked are Jessica's birthday, Daylight Savings, St. Patrick's Day, the First Day of Spring, and Cricket's 7 Month mark.  

  ON THE BLOG:
*I started a Facebook page for 365 at the end of February, and I'm up to 170 FOLLOWERS!  Thank you everyone!  I'm happy to have ya'll here, and I hope you keep coming back!  
*At the end of last month I had seven awesome Google+ followers, and now the blog is up to 19 FOLLOWERS!  Thank you new comers & returning followers!  Come, stay awhile, have a cup of tea, and tell your friends!  :)  I'm so happy to have your company.  
*I made 31 blog posts!  Of all those blog entries I posted 5 recipes, 11 DIYs, and 8 photo based project posts.  

FOR WORK:
*I traveled to 14 different schools.  Collecting payment for 985 miles driven!  I took approximately 2768 individual pictures and 3 group photos.  

MY PERSONAL LIFE:
*Aaron and I sent special happy thoughts to Jessica on March 3rd for her birthday.  We made a card, but it never made it :(  The card made it all the way to California, and then came all the way back to Delaware, and it's been sitting on the desk ever since.  Opps!  I'm terrible with celebrating birthdays!  

*On March 20th we gathered to celebrate my brother, Chris announcing his engagement to his lovely girlfriend Jamie!  

*Cricket reached her 7 month mark, since her cancer diagnosis.

 April's special dates include Easter, our one year wedding anniversary!, and Chris' birthday on the twenty-fifth.
April's little nest calendar is pretty cute too! March was a great month, and April will only be better!  Happy DIYing, chris!

Monday, April 2, 2012

Bacon Mac & Cheese

Happy Nom Nom Monday!  Oh gosh, what I have for you today is TO DIE FOR!  Bacon Mac & Cheese, but there is a special mix of cheeses that bring this dish to the next level.  

This can be made with any brand of box mac & cheese (but Velveeta), cook the noodles as you normally would.  While that is cooking make some bacon extra crispy.  Use enough for each person eating the mac & cheese.  When the bacon is done crumble it up, and set aside.  When the noodles are done drain and set aside.  I like to run cold water over the pasta so it doesn't stick together.  Now for the cheese sauce, use the cheese powder packet, 1/3 - 1/4 cup 2% milk, 1/4 cup cream cheese, and 1/4 cup farmer's cheese.  Once that is all melted together mix in the noodles.  Serve, and top each mac & cheese with the crumbled bacon.  

This is the creamiest tastiest cheese you will ever let cross your palette!!  Absolutely perfect!  I'm not sure I'll be satisfied eating my mac and cheese any other way!  

Have a great week ya'll, happy DIYing, chris!

Sunday, April 1, 2012

March Wrap-up

Happy April!  I'm not much of a jokester, so I don't have any good pranks for the blog.  Not to say I don't enjoy a good laugh.  I'm just usually the one laughing, not making other people laugh.  :)  Anyway, I'm going to stick with my usual monthly wrap-up for March.  Here are ten of my favorite post from this past month. 

I made a few tasty things during March for Nom Nom Mondays.  I dream about this BLT Grilled Cheese Sandwich on a regular basis now.  I also made up Buffalo Blue Cheese Biscuits with random leftovers.  I cooked a savory Roasted Carrot and Pistachio Soup, mmmm.  

On the sweet side of things, I made this Berry Sweet Tea with strawberries, blackberries, and fresh lemons.  I also made a delicious Strawberry and Cream Muffin.  

I delved deeper into the world of outfit photos.  I celebrated St. Patrick's day with a green outfit.  

This outfit was super fun.  I love spring inspired outfits.  I did an excellent nail-do, especially considering how terrible I usually am at painting my nails!  

I tried my hand at taking a Photo an Hour for the first time.  I really enjoyed that project!  Maybe I'll even make two Photo an Hour posts for April!  I also shared a few kid pics, some self-portraits from college with 4x5 film, and my college prints from my printmaking classes.  

Aaron and I worked hard on preparing our new 4x4 raised bed for our little seedlings.  

I followed Martha Stewart's recipe for some super simple hand soap.  I also made some natural cleaning sprays.  

This is my favorite DIY this month.  I love these owl elbow patches, I've even gotten a couple sweet compliments on them too!  I showed how I organize my jewelry, and my stickers and stencils.  I made a spring inspired friendship bracelet.  

I spray painted this cheap boring wooden frame.  I made a hammerhead lino cut, made a simple print with it and a straw.  


I also made this fantastic rag banner, which could be used just as a spring decoration inside, or for a special party.  I also made a belated birthday elephant card.  

That's a fantastic overview of what went down this month on 365 Days of DIY.  I'm excited for April!  Aaron and I got married on 4/16/2011, and we had a bunch of handmade elements to our wedding.  I have some great DIYs planned to celebrate our anniversary.   Happy DIYing, chris!