Showing posts with label christmas decorations. Show all posts

Tuesday, December 11, 2012

Magazine Christmas Tree Make-over


Last year I saw Martha Stewart make this awesome magazine tree, and she had covered her tree in gold glitter.  I'm not much of a gold glitter person, so I just let it be bare.  I thought it looked pretty cool as is, but this year I wanted to give it a bit of a make-over.  

I used flat primer spray paint, and this green spray paint, plus green glitter.  I wanted to use a clear top coat, that I thought I had, but I don't.  

I placed the tree on a large drop cloth, and started with the white layer, then I sprayed on the green.  I quickly sprinkled on the green glitter while the paint was still wet.  I used rubber gloves to lean the paper tree from side to side to sprinkle the glitter on.  

This is how it looks sitting on my window sill.  I think it's even cuter now.  

I want to make this with smaller books, so that I have some trees of different heights.  I have to find an extra thick small catalogue or magazine.  Hope ya'll enjoyed, and happy DIYing, chris!

Sunday, December 9, 2012

Our Christmas Decorations


As promised here are some photos of my Christmas Decorations.  First up is our cute little Christmas Tree.  I strung up some white lights, and the set of white lights I spray painted last year.  Then I went to town hanging our old cherished ornaments, and a few new guys we've picked up over the past couple years.  Most of the family ornaments were given to us by Aaron's lovely mom.  

Here are a few close-ups of our ornaments.  I always see photos of themed Christmas trees, and I think it looks great, but then I break out my decorations, and I can't resist all the old wooden and metal ornaments, and handmade trinkets.
Handmade Dough Dino


This is how we set up our front window.  We ran white lights around the perimeter, and then I hung plastic glittery snowflakes randomly on the window panes.  I have a few candles randomly sitting about, and my DIY Magazine Christmas Tree.  If you'd like to know how I made it I posted a tutorial on it last year, and got the idea from Martha Stewart's tv show.  Last year when I made it I left the magazine pages bare, but yesterday I gave it a little make-over.  I will share how I did that part on Tuesday.  


Hope ya'll are having a good weekend, and happy DIYing, chris!

Wednesday, December 5, 2012

Christmas Present Front Door


If you've been following my blog for any amount of time you know my crafting revolves around what I already have on hand.  So for today's DIY I wanted to dress up my front door for the holidays.  Now I'm not much of a wreath person.  Sure there are TONS of simple DIY ideas for wreaths, but that means EVERYONE has a wreath on their front door right now.  Part of me wants to join in on the fun, but then I remind myself that I don't own any wreath crafting materials.  So I put on my crafting cap, and started spinning up some ideas out of the materials I do have on hand.  I always have present wrapping materials around, and thus was born the idea of wrapping my front door like a Christmas present.  

I began at the top of the door lining up the edge of the wrapping paper with the hinge side of the door.  I taped the paper across the top, and then down the hinge side.  Next I moved to the handle side, and cut out the door knob hole, and the dead bolt hole.  Then I trimmed the excess off the remaining side, and across the bottom, and taped down the edges.  

Then I moved on to the ribbon.  I started with the center ribbon, and taped at the top and bottom.  Next I ran the ribbons on either side of the center 'merry christmas' ribbon.  I ran out of all three, so I used a different ribbon to run horizontally.  I finished it off with a bow.  I'm not going to give instructions on how I made the bow, because it's the first one I've ever made, and there are lots of how to You Tube videos out there.   

I love the way this turned out.  I just wish the bow was a bit bigger, but it's cute.  When I get better at bow making this will be fabulous in the years to come.  Happy DIYing, chris!

Tuesday, December 4, 2012

DIY Advent Calendar


For the past couple days I've been working on making my own version of A Beautiful Mess' Advent Calendar.  I don't have any wooden pallets just laying around the house.  I mean I love all these pallet DIYs, but seriously where do all these people get them?  I actually saw some nice ones earlier today, but when I was able to go back to get them, they were already gone!  In less then three hours they disappeared!  Wooden Pallets are in high demand!  

Anyway, since I didn't have any wooden pallets I used some scrap pieces of wood flooring from a section we had to replace in our bedroom.    My tree is about four feet tall, and it has seven 'branches'.  I bought a bunch of presents from the dollar store, and wrapped them with craft paper, and cheap plastic tablecloths.  I used yarn to hang them from the little nails.  I did this all in one go, and man was it exhausting!  Who knew wrapping 25 little presents, and hanging them from a little wooden tree would be so much work!?!  

To make it more festive I stuck these 3D stickers on the wall.  Aaron got them from Pier1 last year, after the holidays they were deeply discounted.  One of the (few) benefits from my husband working at P1, we have first dibs on all the freshly marked down merchandise.    

It's starting to look a lot like Christmas. We also got our outdoor lights up.  We still need to get a tree though.  

Happy DIYing, chris!  

Sunday, November 25, 2012

Red Christmas Beads


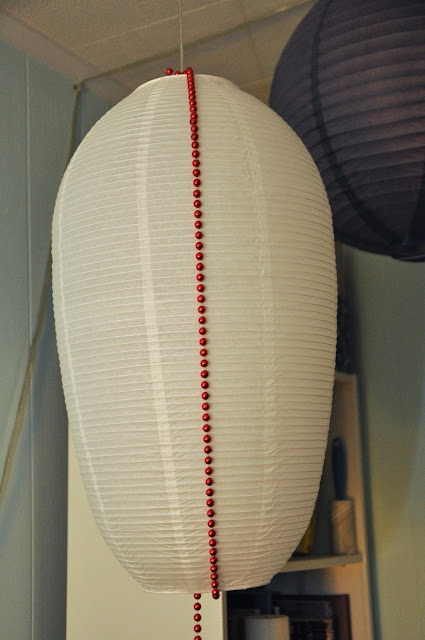
Everyone is getting their Christmas decorations up today, and so I thought I'd join the fun.  I have a white paper lantern hanging in my living room, and to get in the holiday spirit I added some cheap red beads.  All you need for this simple DIY is a white paper lantern, and about 20 feet of red beads.  Start off by looping the end around the metal cross bar at the top of the lantern, and twisting it around on it's self to hold it in place.  

Then run the beads down the length of the lantern, and loop over the bottom cross bar.  

From there run the beads up the length, and drop them down through the center.  Repeat until the lantern is even covered.  If there is excess just loop it around the bottom bar.  

Now my lantern looks Christmas ready.  Happy DIYing, chris!