Showing posts with label wedding. Show all posts

Monday, April 16, 2012

Happy One Year!


Sorry to interrupt our weekly programming of Nom Nom Mondays.  BUT ... Happy One Year Wedding Anniversary, and have a very happy Un-Anniversary to you!!!  Aaron and I are working (boooooo), and then spending some special time together.  Here are some of my fave photos from the wedding.  All photos taken by Kaelyn Michaels Ryan and Tanya Keenan.  


If you'd like to read the rest of my One Year Wedding Anniversary Series try How We Met, Our Wedding Stationary, Cupcake Toppers,  the Wedding Decor, Ceremony Decor, and our Wedding Guestbook.  Happy Monday, and happy DIYing, chris!  

Sunday, April 15, 2012

Pinwheels!


I told ya'll I'd make a post about how to make the pinwheel cupcake toppers you could barely see in my update about wedding cupcake toppers.  Well here it is!  

Start with a bunch of double sided card stock.  I bought these at Michael's, it's a Martha Stewart product.  I cut them down with my paper cutter to just under three inches.  You can play with how large or small you'd like them to be.  I found this was a good size for cupcake toppers.  You could even go down to 2.5 inches, but I find it gets harder any smaller than that.  

Now, lightly draw a line in pencil from each corner making a cross.  You will want to erase this line later, so don't press too hard.  

Next, poke a hole in the center, and one corner on each triangle.  Be consistent with where you place your holes.  Either on every right corner on the triangles, or every left corner.  After you've poked all your holes, cut on each line you drew.  Leave a quarter inch of paper uncut from the center on each line.  Now carefully erase your lines, try not to rip your paper.  

Turn a corner with a hole over, and stick a brad through the first triangle.  I also bought the brads at Michael's.  Then working clockwise slip the next corner with a hole on the brad.  Keep going until you have all four corners on, then lower the brad through the center hole, and flatten the metal flaps across the back.  

Now, you are ready to hot glue the pinwheel on the wooden stick.  I used Woodsies, i think I bought these at Michael's too.  Use a small dab, and carefully place it down.  It wont be able to spin, but it's super cute, and extra easy to make this way.  

Once they are dry you can stick them in your plants or in cupcakes.  I have one in my pen cup to add some whimsy to my boring office pens.  Heck, you could skip hot gluing it to a stick, and glue it to a headband, or hair clip, and BAM! you'd have a cute hair accessory!  I love DIYs that have many uses!  Happy DIYing, chris.  

Friday, April 13, 2012

Wedding Ceremony Decor


Back to the One Year Wedding Anniversary Series!  Today I'm sharing with ya'll the way I decorated for the ceremony.  If you'd like to catch up on my previous post in the series you can start with How We Met, then Our Wedding Stationary, Cupcake Toppers, and Wedding Decor.  Hope you enjoy!

Photo taken by Kaelyn Michaels Ryan
We held the ceremony in a historical Quaker church.  I love how the pews are curved.  I made the bunting with scrapbook paper.  I cutout triangles, and then folded the top half inch over baby yarn, and glued them in place.  I made three sections, reaching about ten feet in length.  My friends helped wrap tulle around the top of the banister. 

Photo taken by Kaelyn Michaels Ryan
We bought these paper lanterns and ribbon at the dollar store!  My mom made the bows, and my friends help hang them on the pews.  I should have bought those plastic picnic tablecloth clips to hold them in place, but I really thought they would easily hang there.  My friends worked really hard to keep them in place for me, they were awesome!  

Photo taken by Kaelyn Michaels Ryan
This is our altar. We did a unity candle, but I bought the cheapest candles and stands I could find.  I made a cute matchstick holder, so we wouldn't have an ugly matchbox sitting there.  You can check out this tutorial, if you'd like to see how I made my matchstick holder.  My mother-in-law, who married us contributed that lovely seashell with the stand, we used it to drop the used matchsticks in.  As part of the ceremony Aaron's mom wrapped the ribbon around our wrist as a symbol of everlasting bond.  Luckily the table and lace came with the location!  

Photo taken by Kaelyn Michaels Ryan
This was the vestibule where everyone entered the church, and I placed our programs and some tissues there.  I bought a basket at the dollar store.  Printed out some 'programs', cut out the letters, and carefully tied them together with sewing thread.  I added the heart at the top, and wrote 'help yourself' on it.  

Photo taken by Kaelyn Michaels Ryan
 I made the programs by printing out the middle pages from my computer.  Then cutting scrapbook paper to the same size the the book pages.  Once I paired all the pages up I poked two holes half an inch in, and then ran some baby yarn through to tie it all together.  

Hope ya'll have a fantastic weekend!  I'm going to try to get all my post done for Saturday, Sunday, and Monday on Saturday while Aaron is at work.  Wish me luck!  :)  Happy DIYing, chris

Wednesday, April 11, 2012

Wedding Decor


With last week being a holiday, I only worked one day, but this week I'm already up to three, and I have another early day tomorrow.  Most work days I wake up around quarter of five in the morning.  Well it being Wednesday all those early morning are catching up to me.  I feel ready for bed, so I apologize now, if this is a little off.  I'm continuing with my One Year Wedding Anniversary series.  To catch up you can read  How We Met, our Wedding Stationary, and our Cupcake Toppers.  Today I'm going to share some of the decorations we had.  

photo taken by Tanya Keenan
Photo taken by Tanya Keenan
This was our favor, a Candy Bar!  All the guest loved filling up on candy before they left, and I didn't mind taking home any leftovers.  There really wasn't much leftover, but the salt water taffy, because I over-bought it.  The taffy was cheapest to buy in gigantic bags.  We really shopped around for this one, because this can get super spendy.  The good thing is candy keeps for a long time, so we started this a few months before the wedding.

I made a few hundred of these double layer paper flowers.  I used them all over the place.  We had the wedding in a historical building, so we were not allowed to hang anything or really do much decorating.  The place was fabulously beautiful on it own, but I needed to add my own little touch.  I love these beautiful flowers, I even made some of the paper for a small portion of the flowers.  If you'd like to know how I these cute dudes, you can check out this tutorial.

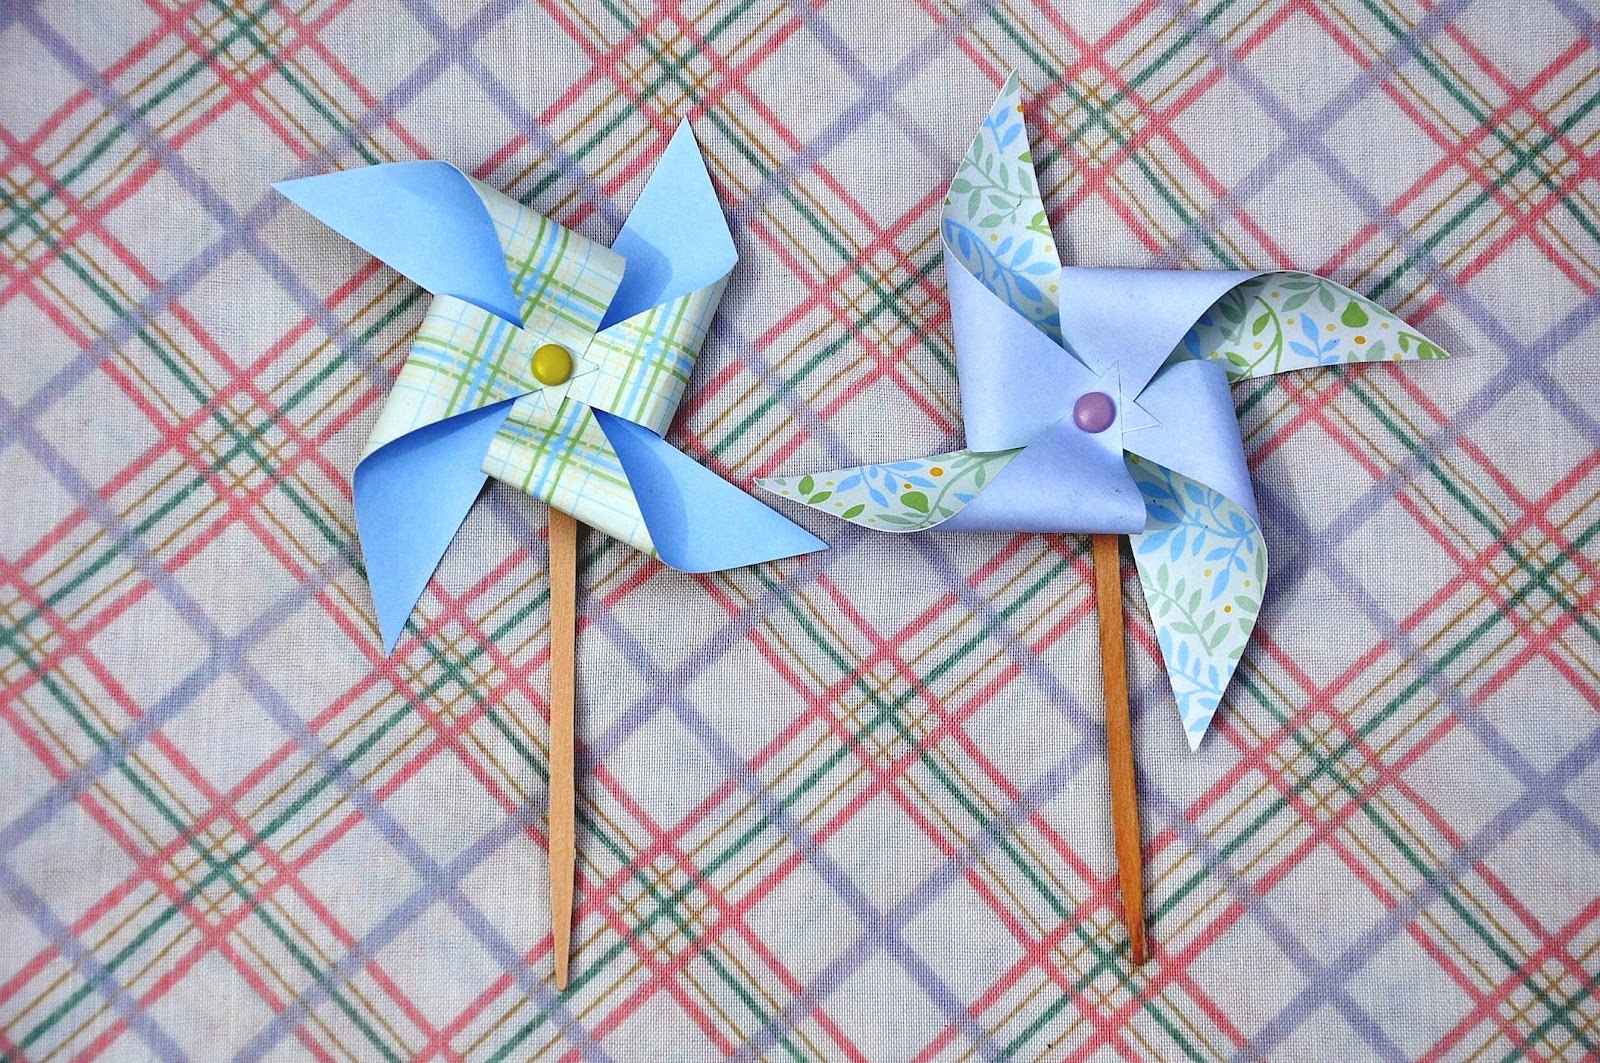
Here is an example of the my pinwheels.  These are larger than the ones I used on the cupcakes.  I used these for my centerpiece arrangements on the tables scattered around.  We didn't have assigned seating, or a sit down meal, that's just really not our style.  We had lush hors d'oeuvres served by waiters, and the guest were free to wander and mingle about.  Plus this saved us a big deal of money.  We did make sure to have a chair for everyone, so they could have a place to sit.   

Photo taken by Tanya Keenan
This is our thumbprint tree, and you could use this as a replacement for a guestbook.  I drew the tree months in advance, with colored pencils, and I wrote our names and date in black marker.  Before the wedding I had Michael's matte and frame it.  They were super helpful, they held onto the glass for me, and then after the wedding I gave it back to them to finish the piece.  

Photo taken by Kaelyn Michaels Ryan
I supplied the thumbprint tree with this cute stackable ink pad, a stack of scratch paper for people to test their thumbprints, and a cup of pens.  Plus I can't forget the basket of Handi Wipes, and the mini trash pale (with lid) for them to easily dispose of all the trash.  

Photo taken by either Tanya or Kaelyn
This is my brother Chris on the right, Aaron's sister Jessica, and his Aunt Teressa all using the thumbprint tree.  

Photo taken by Kaelyn Michaels Ryan
My husband didn't want to get rid of the guestbook all together, so I bought a cheap guestbook, and turned it into a scrapbook of Aaron & my kid pics.  It was a big success at the wedding.  This is Aaron's cute grandparent's Roland and Helen checking out the photos in our guestbook.  I'll make another post later that has some images from the actually guestbook.  

Wow, hope that wasn't too much.  Happy DIYing, chris!

Tuesday, April 10, 2012

Cupcake Toppers


Happy Tuesday, and welcome back to the One Year Wedding Anniversary Series!  If you are just finding my blog, you can catch up with How We Met, and our Wedding Stationary.  Today I am sharing my cupcake toppers.  I handmade all of my toppers, and gave them to my baker to put them on all the cupcakes.  It was rather nerve racking giving up all my precious babies for someone else to take care of, and make sure they were all perfectly placed.  I'll admit it, I have some a lot of control issues, and I'm a bit of a perfectionist.  

When our baker asked us about what we wanted to do for an anniversary cake, we looked at each other baffled.  We had never heard of such a thing.  When the baker explained that it was a cake you would freeze and eat a YEAR LATER, we were even more confused.  Why did that become a thing?  Why would anyone want to eat a cake that has been frozen for a year????  For all of you who did this, I hope your marriage lasts longer than anyone else's!  You definitely deserve a long marriage, especially if your significant other wanted to eat a year old cake for your first anniversary with you!

We used our cake to cut into during the reception, and share our first piece together.  The top cake was a Oreo marble layered cake, soooo good.  It was the only thing I ate during the wedding.  My tummy was too jittery to try any of the yummy food we bought.  I was sad I never got to try any of our caterer's food!  We never had a tasting before the wedding either, but that was my biggest disappointment with the food, so I really can't complain. 


We had chocolate cupcakes with buttercream frosting, red velvet cupcakes with cream cheese icing, yellow cake with buttercream frosting, and the orange icing was peanut butter flavored.  We grabbed a couple peanut butter cupcakes for our train ride to NYC for the first part of our honeymoon.  They were amazing.  Our baker is truly talented.  

All photos taken by Kaelyn Michaels Ryan, and Tanya Keenan.  Cupcakes made by Sweets to You By Ginger.  

Sadly, I don't have any photos of the pinwheel toppers I made.  I'll make some more, and make a post about it.  I also made these super special paper flowers made with fancy origami paper, but they never made it onto our topper cake.  I didn't care about either of these things on the day of the wedding.  I didn't realize I completed failed to ask my fantastic photographers to get a few snaps of all my little handmade details.  Plus I should have taken some photos after I had set-up some of the other things the day before, but I broke the lens mount on my camera a few days before the wedding.  It was an easy repair we took care of on the second day of the honeymoon, but it sucked not having my camera on the pre-wedding days.  I was so angry with myself that day, and it was super embarrassing.  To make up for it, in NYC we bought a macro lens and a sporty camera bag at B & H Photo.  We talked to this awesome jewish dude, and we were elated with our experience there.  Plus they directed us to a great place that fixed my camera for $50 in one hour.  

That's all for today, hope ya'll enjoyed, happy DIYing, chris!