Showing posts with label scrapbook paper. Show all posts

Saturday, January 26, 2013

Outlet Cover Make-over


Since we moved into our house it's taken me awhile to get back into doing projects specifically home related.  There is a long laundry list of handy home repairs needed to be done.  I got burnt out on all the work I had to do to make this place livable.  Once we settled in I was in full work mode, without hardly a moment to think about working on the house.  Now that I have time I've been overwhelmed as to where to begin.  The recent cold front that moved in, and has been making it feel like winter, gave me a great idea where to start.  We should have done this months ago.  Long before it got cold, but better late then never!  

An important part to a home is making it air tight.  This is important whether you're running the heater or the A.C.  You don't want all your heated/cooled air escaping out of every little crevice.  Air likes to seep out through door and window frames, around outlets, and baseboards.  We removed most of the floorboards and outlet covers months and months ago.  All of the outlet covers needed to be replaced, and I just kept putting it off.  I knew I would buy the least expensive white option, which meant it would be an ultra boring shopping trip.  It never seemed like something worth going to the hardware store for on it's own.  The other day we found ourselves there buying a snow shovel, so we also picked up some outlet covers.  We have this one wood wall, and the white outlet cover looks horrendously out of place.  


So I used this DIY tutorial from The Plumed Nest to cover the outlet cover.  As the grand-daughter of an electrician, I have to wonder if gluing paper around my electrical outlet is a good idea, but what the heck!  We don't use this outlet anyway, so why not make it decorative?  I began by finding a scrapbook paper that would blend well with this wall.  Then I cut it out about a half inch larger than the outlet cover.  

  Then I applied Mod Podge to the outlet cover and laid it down on the backside of the paper.  I folded the sides in first, and Mod Podged them down.  I cut slits at the corners, and trimmed off the triangles to make them fold in nicely.  For the holes I cut 'x's across them, and folded the triangles in.  Then Mod Podged the flaps down.  I finished by coating the whole thing in a thin shellack of Mod Podge.  

Doesn't it look better now?  


I'm also happy I found a use for this paper so I can enjoy it on a daily basis.  Oh, and speaking of that electrician, today is his 85th birthday!  Happy birthday G-Dad, and Happy DIYing, chris!

Wednesday, September 12, 2012

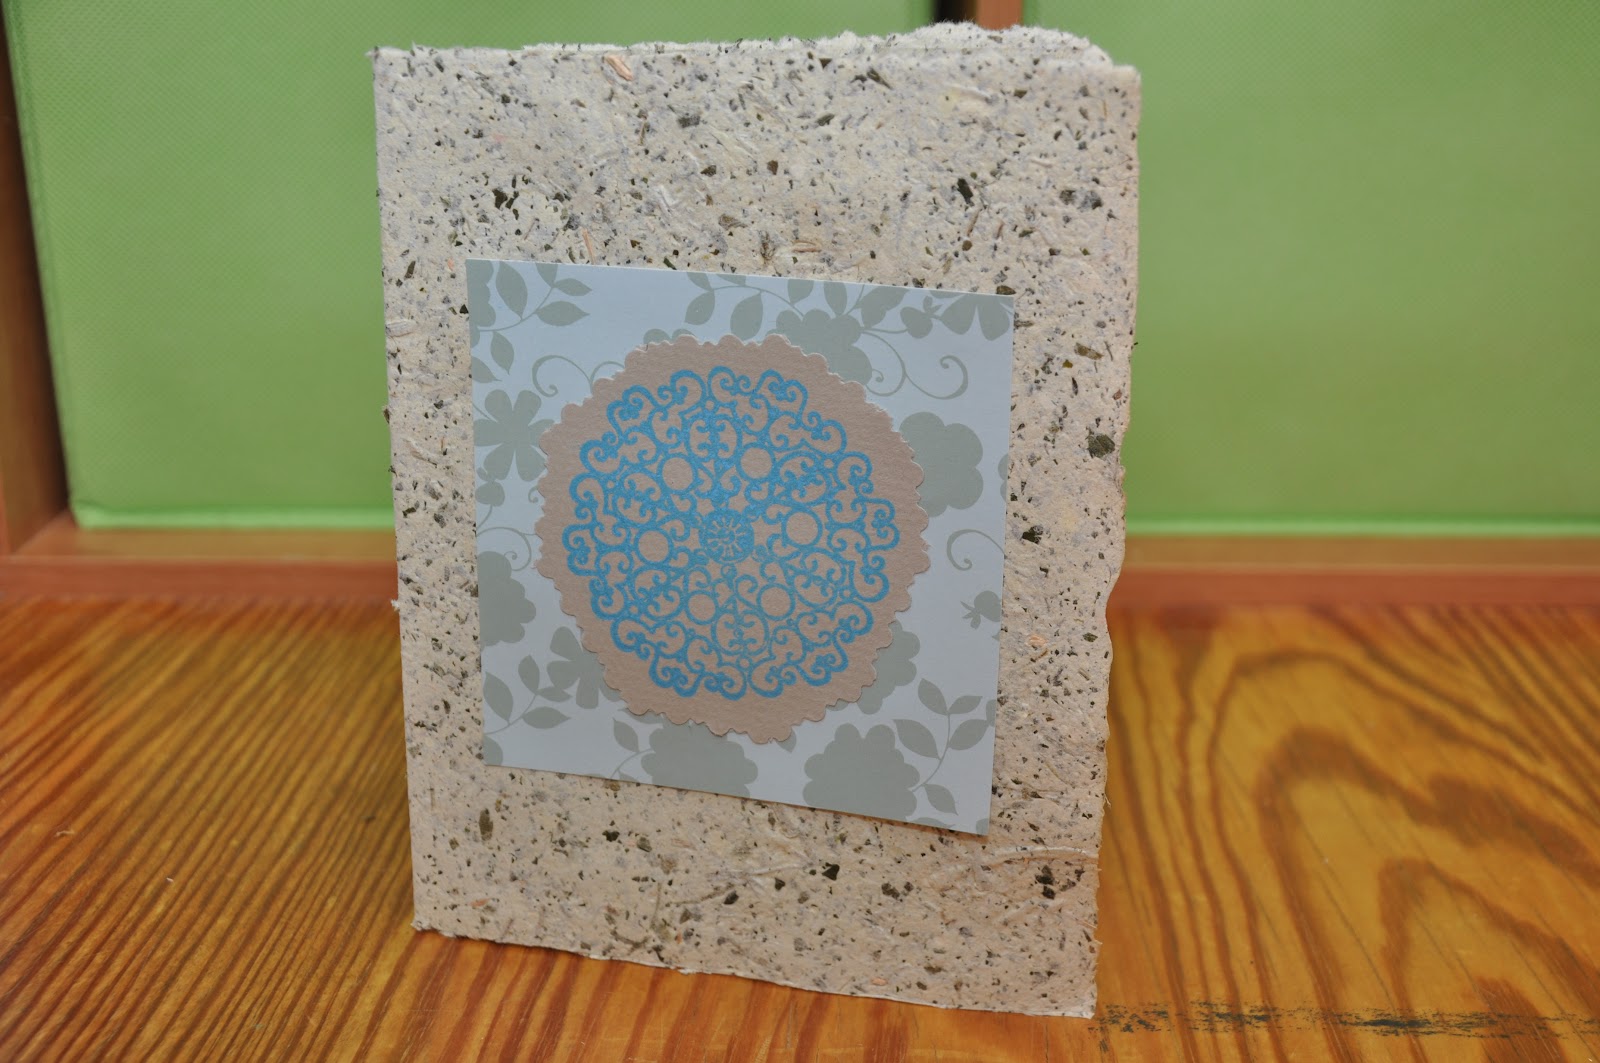
Handmade Masculine Card


I finally made a card for my brother's package.  Now all I need to do is add some stuffing, and get it over to DHL to be shipped.  For today's DIY I will share how I made the card. 

I started off by stamping this large decorative stamp onto a piece of grey pastel paper.  The first try I didn't press hard enough, or charge up the stamp with enough ink.  So on the second try I made sure to correct those two possible mistakes, and it came out perfectly even.  

Next, I used a pair of fun scissors to cut out a circle around the stamp.  I practiced on the bad stamp before attempting with the good one.  

Then I found a square of scrapbook paper, and cut a piece of handmade paper down to size.

I folded the large paper in half, and then glued the scrapbook paper square to the center of the front.

To finish it off I glued the stamped circle to the front of the scrapbook paper square.  I'm happy with the turn out of this card.  The colors work nicely together, and it's not too girlie either.  Girlie cards come naturally, but I have to spend a little more time thinking about how to make a masculine card.  

Have a lovely day, and happy DIY, chris!

Sunday, September 2, 2012

August/September Days


At the beginning of the year I made a monthly calendar by hand, and each month I've been adding stamps and drawings for the big events that happen.

Here is August, a butterfly made out of different scraps of fancy paper.  For June, July, and August I went with a Hungry Caterpillar theme.  June was the caterpillar, July was the cocoon, and August was the butterfly.  

In the beginning of the month we went up to New York for our friend Derick's bachelor party.  My mom's sister Lynn had a birthday, and I totally failed to call her to wish her a happy birthday. Boo me!!!  I hope she had a lovely day!  

When I flipped over to September I was really pleased.  I forgot what I had drawn, and it's way cooler than what we've been staring at for the last month.  I'm beyond over the butterfly I made for August.  

This month is going to be another busy one.  We have two weddings to go to.  The first one is Aaron's cousin's wedding, and we'll be traveling down to D.C. for the day to celebrate with his family.  At the end of the month we have Aaron's best buddy Derick's wedding.  Aaron is in this wedding, and it's all the way at the tippy top of Vermont, so it will be a long weekend of celebrating.  We can't wait!  :)  

I was busy all day with the house, and getting ready for tomorrow's festivities, and I'm beat!  Hope ya'll have a great day, and happy DIYing, chris!  

Sunday, June 3, 2012

Fancy Keepsake Box DIY

I'm home from Vermont, but this thing is still on auto pilot, because today I will be at my niece's baptism.  So I thought it would be appropriate to share what I made for her gift.  I haven't been to many baptisms, and this is the first that I am bringing a gift to, so I really had no idea what to give.  I've heard that bonds are a popular gift, but I figured she'd be getting a lot of those, and I wanted to give something a little more thoughtful.  My next thought was something personalized to commemorate this momentous occasion.  When I googled some ideas for personalized baptism gifts I didn't find anything that struck my fancy.  My family isn't religious, and it didn't make much sense (to me) to give my niece something with psalms, or bible quotes, or a giant cross, which seemed to be my only options.  There is a plethora of non-baby-friendly jewelry, giant crosses, and stuffed lambs as gift choices.  I had a really hard time thinking of anything that is baby appropriate and religious, but not overly religious.  

What I came up with is a suped-up wooden treasure box.  I had one of these when I was a kid, and I loved keeping special little things inside of it.  This gift idea seemed the most reflective of me.  I guess it doesn't have much to do with the ritual, but maybe she can store all her new non-wearable crosses  in it.  Or I imagine she'll be receive lots of pretty jewelry today. 


I bought a small oval shaped wooden box from Michael's, and I used a bunch of scraps of special decorative papers, and applied them to the box with Mod Podge.  


Here is the wooden box after I glued all my pieces down.  Sorry I don't have any pics of the process.  I simple traced the different parts of the box on the pieces I wanted to use, then cut them out.  I played with their placement before I started glueing them down.  Once I started gluing I had to keep going, because I was layering the next piece under the previous piece.  I covered the whole thing with paper and Mod Podge, and then I gave it a couple extra coats of Mod Podge.  


I painted the interior and the top lip of the box with acrylic paint.  They call this color ocean breeze.  I liked using non-traditional girl colors, plus of course a little pink.  All the patterns and colors I picked work perfectly together.  


Once I had enough coats of paint on, and everything had dried for at least twenty minutes I coated the whole box in satin varnish.  I applied three coats.  


To finish the box off, on the inside of the lid I wrote Annabel's name, and the date of her baptism.  


I also added a super cute Martha Stewart rocking horse fabric sticker to the top.  I hope she cherishes it as much as I enjoyed making it, but if it ends up in a closet collecting dust, I think I discovered a new thing I'm good at making.   


Well I hope ya'll had a great weekend, and happy DIYing, chris!

Sunday, April 15, 2012

Pinwheels!


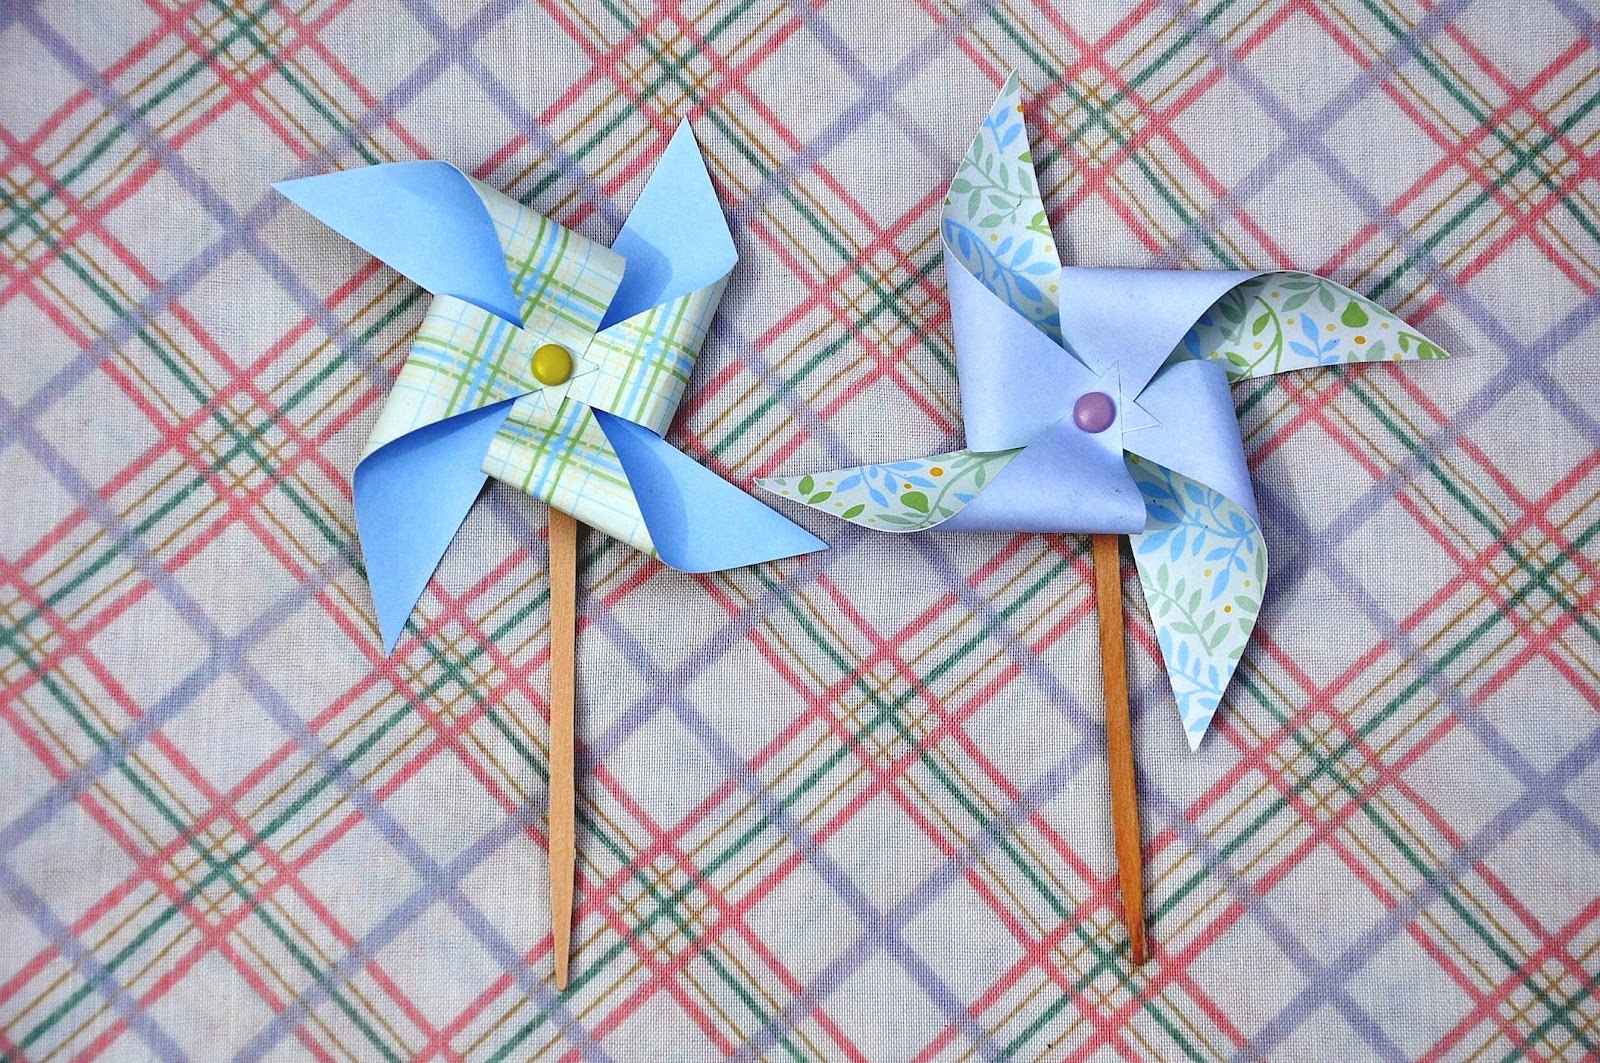
I told ya'll I'd make a post about how to make the pinwheel cupcake toppers you could barely see in my update about wedding cupcake toppers.  Well here it is!  

Start with a bunch of double sided card stock.  I bought these at Michael's, it's a Martha Stewart product.  I cut them down with my paper cutter to just under three inches.  You can play with how large or small you'd like them to be.  I found this was a good size for cupcake toppers.  You could even go down to 2.5 inches, but I find it gets harder any smaller than that.  

Now, lightly draw a line in pencil from each corner making a cross.  You will want to erase this line later, so don't press too hard.  

Next, poke a hole in the center, and one corner on each triangle.  Be consistent with where you place your holes.  Either on every right corner on the triangles, or every left corner.  After you've poked all your holes, cut on each line you drew.  Leave a quarter inch of paper uncut from the center on each line.  Now carefully erase your lines, try not to rip your paper.  

Turn a corner with a hole over, and stick a brad through the first triangle.  I also bought the brads at Michael's.  Then working clockwise slip the next corner with a hole on the brad.  Keep going until you have all four corners on, then lower the brad through the center hole, and flatten the metal flaps across the back.  

Now, you are ready to hot glue the pinwheel on the wooden stick.  I used Woodsies, i think I bought these at Michael's too.  Use a small dab, and carefully place it down.  It wont be able to spin, but it's super cute, and extra easy to make this way.  

Once they are dry you can stick them in your plants or in cupcakes.  I have one in my pen cup to add some whimsy to my boring office pens.  Heck, you could skip hot gluing it to a stick, and glue it to a headband, or hair clip, and BAM! you'd have a cute hair accessory!  I love DIYs that have many uses!  Happy DIYing, chris.  

Friday, January 20, 2012

Making A Standard Sized Envelope

Making A Standard Sized Envelope
WHAT YOU'LL NEED:
- Ruler
- Pencil & Eraser
- Scissors
- Glue Stick
- Razor
- Scrapbook paper
- Old Map (or large magazine sheet, or wrapping paper, ect.)


Directions:
Begin by tracing a card in the center of a scrapbook paper, or any similarly size and thickness paper.  This will be used as the template.

Next measure out the top flap for the envelope.  1)Start by measuring to the middle of rectangle.  2) Draw a line perpendicular from the center.  This line will be as long as one of the bisected section of the perpendicular line.  3) Now on each corner draw a 1/4" line up making a right angle.  4) Then center a 2.5" line over the center perpendicular line.  5) Now connect the corner lines up to the top line parallel to the center square.  You pretty much repeat the same process for the two side flaps, and bottom flap.  For the side flaps the top or point is only a 1/4" in length, instead of 2/5" like the top flap.  The bottom flap has a longer line on the top, and the middle perpendicular line is longer (three inches in length instead of 2.5").  

Now you can cut out the envelope template.  Then draw two windows for the address locations.  For my address I drew a 3"x1" rectangle, and for the receiver's address I traced the lid for a vaseline container.  I used a razor to cut the windows out.  

We have finished the template now, and we can start cutting out the pieces for the envelope.  I used a map for the outside layer, so I traced the template including the windows and cut them out.  I used one-sided scrapbook paper for the inside, I traced the template (but not the windows) and cut it out.  

Add glue to the edges of the map cutout, on the backside.  Then place the two pieces together, have the white side be showing through the windows.  Then on the inside of the envelope (in my piece it's the scrapbook paper), fold the flaps in.  I used a bone folder to score the fold lines before folding, this helps make the folding easier.  Fold the sides in first, then the bottom up.  After eyeballing where the bottom will fall over the side flaps add a line of glue on the inside of the bottom flap.  Then adhere the bottom flap to the side flaps.  

Now you can make as many envelopes as you'd like.  When you've done this once, you'll start seeing envelope material everywhere!  Experiment with your size and materials, and have fun!

Happy DIYing!

Friday, January 13, 2012

Finishing touches on the Calendar!

Finishing off my monthly calendar!  I should go ahead and mark all the birthdays and holiday's now, but I would rather do it each month at the beginning.  So, first I matched up all the months that will pair together for binding.   I glued an extra scrapbook sheet onto the day's for December and the January art.  This helps add strength for binding.  Next, cut up a bunch of 1.5 inch strips off of basic printer paper.  Add a line of glue on one side of a strip.  I used Elmer's No-Wrinkle Dual Tip Glue Pen (the fat end).  

Then, place the strip half way on the days for June at the top.  

Now place August's sheet which matches up with June's days on top of each other.  Line them up perfectly first, then apply glue to the other half of the strip.  Fold it over apply pressure all over making sure to smooth the pieces together.  


Continue to do that for all the corresponding sheets.  Once you have all of the sheets matched up together stand them up, and line the middles up perfectly.  Stick a needle and embroidery thread through an inch up from the end of the binding sheets.  

Stitch a straight run up the middle.  I went back over the front stitches so it was one continuos line, hopefully that will add strength.  

I made sure to space the stitches so the last one went out the back, and then I knotted it on the backside and cut it off.  

I have a tiny nail in the wall for my calendar already, so I used a binder clip to hold the first month up.  

Then I stamped cupcakes for the birthday's during January, and we have a graduation party to go to on the 28th so I stamped a party hat & wrote the time down.  


I also colored the cupcakes in with colored pencil, and wrote the birthday person's name in sharpie next to it.  
                                        
Oh, and today is our one month anniversary, Happy DIYing!

Thursday, January 12, 2012

December

For the last month of the year, December, I decided to freehand a Christmas tree with glitter glue. Then I wrote out 'December' at the bottom.  Tomorrow I'll put the finishing touches on whole calendar.  


Hope you've enjoyed!  Happy DIYing!

Wednesday, January 11, 2012

November

Today I worked on November.  For this month I wanted to revisit a classic children's craft - the paper turkey.  I'm sure anyone who attended public elementary school in the US made one of these at least once.   To start I cut out all my turkey pieces, 17 feathers, one rainbow shape, one circle with a flat bottom.  one turkey head & neck, one beak, and one wing.  

Second, I glued all the feathers down to the scrapbook paper.  Starting on the bottom and working my way toward the center.  Glue one feather down on the left, than one the right to keep things symmetrical. 


Then, I wrapped maroon yarn, one brown, and one black embroidery thread around the rainbow shape.  I taped down the ends on the back.  When that was done I hot glued that overtop of the feathers.  

Next, I glued the neck to the circle, then the beak to the head, and the wing to the body.  Then I hot glued the front part of the turkey to the yarn.  


Finally, I wrote 'November' out in gold glitter glue.  

Happy DIYing!