Showing posts with label tutorial. Show all posts

Tuesday, February 19, 2013

Wooden Skewer Wreath


I was rummaging around in my craft room today, and I came across this hand full of wooden skewers.  I started playing around with them on the floor, and came up with this shape.

I attached the pieces together by wrapping embroidery thread around them tightly.  I immediately decided this looks like it could become a wreath, so I set to work attaching more pieces.  I started by creating a triangle at one of the points with a new skewer, and attaching it with a dab from a hot glue gun.  

I continued attaching more skewers at every point, until I had a second layer of skewers all the way around.

Then I repeated that over and over until I used up all my skewers.  

I designated a point to be the top, and tied a short strand of embroidery thread, and then hung it on my door.  

I love the simplicity of the way the skewers all nest together.  I might dress this up in some way for spring, but for now I'm going to admire it's natural beauty.  

Happy DIYing, chris!

Tuesday, August 28, 2012

Hair Bow-Tie DIY


I made a ribbon bow-tie a few months ago, but I never did anything with it.  I simply used a two inch wide wire lined ribbon, about four inches in length.  Sewed the ends together, then did the same with a quarter inch silk ribbon, about an inch in length.  I slipped the smaller ribbon over the larger ribbon, and wah-lah, a bow-tie!

When I got home from work today I decided to stick a hair clip through the back, and make it a hair bow-tie.  

It's a great size for my head, and considering how easy this was I could make a bow to match every outfit!  

Happy DIYing, chris!

Wednesday, August 22, 2012

Fabric Bracelet


Hey all!  Today I'm making a fabric bracelet.  I wear it as part of my work uniform, because I have to cover up my wrist tattoo.  I've made this bracelet before, but not for the blog, and my old one was stolen!  I used to get tons of compliments from the kids I photograph, when I wore this bracelet.  I knew with the beginning of this season I needed to make a new one.  I use an old polo shirt that was my mom's from when she was my age.  It's a great way to keep this old favorite around, even though it's gotten worn out, and doesn't look so great as a top.  

To begin I used a section that had a hem on two sides, and cut out a piece about 7 inches by 4.5 inches.  I folded the long side in, and pinned down to hem that edge.  

Then I folded the piece in half with the stitch side of the hems up. I sewed the ends together.  I consistently stitched the needle through the same side of the fabric, and made a tight loop over the ends.  This binds off the end, and makes for a neater and softer finish.  

Here is the finished result.  I love the soft old fabric.  This took me about two hours to sew by hand, while talking, watching TV, and snacking.  A great couch activity.  

I hope this bracelet gets as many compliments as it's predecessor.  Have a lovely day, and happy DIYing, chris!  

Wednesday, August 15, 2012

Tri-colored Braided T-shirt Bracelet


Another DIY I left until the end of the day, but I'm really happy with the results of this crafty project I threw together.  I made a tri-color braided bracelet.  

I used three different t-shirts in yellow, orange, and blue.  I love these colors together, they complement each other so well, and they're unisex!  I used scissors to cut three strips of each color.  The strips each measured a half inch wide, and eight to ten inches long.  I used the needle and thread to sew the strips together at the beginning and end.  

I also sewed all three colors together, and then I braided them together.  At the end I sewed the two ends together.  I left the different length ends, because they add a fun flare.  Like a mini pom-pom.  When sewing the ends make sure to go through all the strips of fabric, that way it's nice and secure and wont come unraveled.  

A simple craft, with great results.  Anyone could do this with some extra fabric, and twenty minutes to spare.  I'm fairly certain of seen similar bracelets at Forever21 sold for around five bucks.  This only cost me time. 

I'm thinking up an outfit to wear this with, and when I'll have my next chance to show off my latest creation!  I wear my DIYs proudly, and it makes my day when someone complements them.  I work with children, and it's the highest complement when one of them tells me my bracelet is cool.  

What's your latest creation?  Do you love to show it off?  Have a lovely day, and happy DIYing, chris!  

Tuesday, August 14, 2012

Button Earrings


O. M. G.  This morning I left for work at 8:30AM, and I only got home for the day at 9:45PM!  I left work at one, but I had to go to my house, and hang out while some contractors did some work.  Such a long day, and I only ate a small lunch this afternoon.  I didn't realize they would work for so long, and didn't plan to do my DIY until I got home.  Obviously when I got home I needed to eat, and by then it was ten thirty.  So needless to say today's DIY is beyond simple. 

I used these super tiny buttons to make post earrings.  

I simply hot glued them to the head of an earring post.  You can buy earring posts for jewelry making at Michael's.  Or at least that's my go-to-craft-supply store.  I love mixing and matching the different colors. 

See how tiny they are, aren't they cute?  I actually made this pair a long time ago, and they've held up pretty well.  I want to make more, but I might use an epoxy instead of hot glue to attach them to the earring posts.  I think epoxy will hold up longer, and will be easier to get a nice clean finished look.  

Hope ya'll are having a great tuesday, and happy DIYing, chris.  

Tuesday, August 7, 2012

Bleach Dip Dyed


I was cleaning the other day, and I accidentally splashed a bit of bleach on my tank top.  I wear a tank top almost everyday, so I wanted to come up with a fix for the bleach dribbles.  I immediately thought of dip dying with bleach.  I can't take ownership to this idea either.  I've seen it around the internet too, but there is a particularly beautiful lady who has caught my eye with her lovely bleach dipped creations, Liska Cole at A Glass Jar.  I totally have a girl crush on her.  Her photos make me want to move back to California yesterday.  So today's DIY is not only to save my tank top, but also to celebrate how awesome A Glass Jar is.  This is the tank top, and a close up of the stains.  


I mixed about a 1/4 cup of bleach with four cups of water, and soaked the bottom half of my tank top.  Then I made dinner, and ate while it bleached.  

Then I realized I couldn't stand to only use my bleach mixture once, so I found a couple more things to bleach.  

I threw them all in the washer, and then dryer, and here are the finished products.  Sorry no before photos of the other two tops.  The last one didn't change at all.  The tag doesn't list the materials, so I'm going to guess it's made of something synthetic.  


I'm glad I tried out this simple DIY.  I like the middle, green shirt the best.  I want to try this out on some shorts, or maybe a skirt next.  I'm already back at work, getting ready for the fall picture season.  With buying the house, and all the work that still needs to be done on it, and already back working nearly four days a week, I don't have much time for the blog right now.  So I apologize for anything being below par on the blog.  I made a promise to myself to update this everyday, but the posts might get extremely short in the future.  I hope ya'll are able to stick through it with me, because I promise this blog will rock socks once Aaron and I get settled into our house.  Until tomorrow, happy DIYing, chris.  

Wednesday, June 20, 2012

Wide Macramé Bracelet Part 2


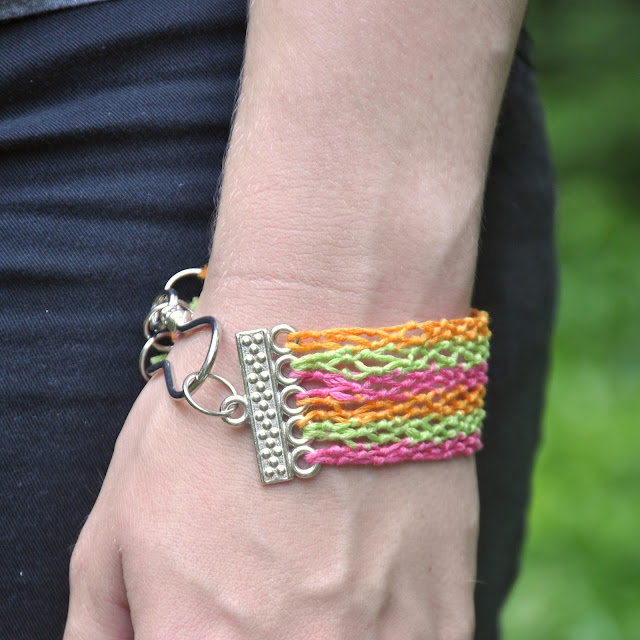
Oh man, hello Summer!  The high today for my area is 101ºF!!! Whew-wee, it's hot out there.  I didn't let the heat hold me back, I didn't delay!  I got the macramé bracelet I started yesterday finished.  To see the first half of this tutorial, check out yesterday's post.  Now on with how you'll finish off this bracelet.  


I periodically tested the bracelet around my wrist, and once I reached my desired length I began tying the last row onto the jump links.  The last row has to be a row that includes the first string in the first knot.  Other wise you'll have a lose end.  

I have twelve strands, so I tied four on each of my three jump rings.  

When I was done tying on all the embroidery threads I tested the bracelet out, and made sure I could easily attach the hook.  The first time I had to remove the jump rings, and add a couple rows.  I tested it again, and it was perfect, that's when I trimmed the long tails off.  My guess for 56 inches of thread to begin with was a bit off, at  least it didn't mess up the project.  I just need to figure out what to do with all these thread scraps.  :)  

I like the way this bracelet sits on my wrist, and the clasp is lovely.  

Of course I love the colors too.  :)

 I'm totally enjoying this technique.  I want to make a ton of these.  I'd like to try better thread, and find a bead that would work, and play with different clasps.  I guess there are only so many of these I need though, I wonder if my female family members would want one?  I wonder if strangers would be interested in buying them ...  I'd totally enjoy making a ton of these.  I love playing with all the colors, and there are so many different materials I could try out.  

Well I'm off to make up some more fun things.  Hope you're having a lovely day, and don't let the sun burn you out!  Happy DIYing, chris.  

Sunday, June 3, 2012

Fancy Keepsake Box DIY

I'm home from Vermont, but this thing is still on auto pilot, because today I will be at my niece's baptism.  So I thought it would be appropriate to share what I made for her gift.  I haven't been to many baptisms, and this is the first that I am bringing a gift to, so I really had no idea what to give.  I've heard that bonds are a popular gift, but I figured she'd be getting a lot of those, and I wanted to give something a little more thoughtful.  My next thought was something personalized to commemorate this momentous occasion.  When I googled some ideas for personalized baptism gifts I didn't find anything that struck my fancy.  My family isn't religious, and it didn't make much sense (to me) to give my niece something with psalms, or bible quotes, or a giant cross, which seemed to be my only options.  There is a plethora of non-baby-friendly jewelry, giant crosses, and stuffed lambs as gift choices.  I had a really hard time thinking of anything that is baby appropriate and religious, but not overly religious.  

What I came up with is a suped-up wooden treasure box.  I had one of these when I was a kid, and I loved keeping special little things inside of it.  This gift idea seemed the most reflective of me.  I guess it doesn't have much to do with the ritual, but maybe she can store all her new non-wearable crosses  in it.  Or I imagine she'll be receive lots of pretty jewelry today. 


I bought a small oval shaped wooden box from Michael's, and I used a bunch of scraps of special decorative papers, and applied them to the box with Mod Podge.  


Here is the wooden box after I glued all my pieces down.  Sorry I don't have any pics of the process.  I simple traced the different parts of the box on the pieces I wanted to use, then cut them out.  I played with their placement before I started glueing them down.  Once I started gluing I had to keep going, because I was layering the next piece under the previous piece.  I covered the whole thing with paper and Mod Podge, and then I gave it a couple extra coats of Mod Podge.  


I painted the interior and the top lip of the box with acrylic paint.  They call this color ocean breeze.  I liked using non-traditional girl colors, plus of course a little pink.  All the patterns and colors I picked work perfectly together.  


Once I had enough coats of paint on, and everything had dried for at least twenty minutes I coated the whole box in satin varnish.  I applied three coats.  


To finish the box off, on the inside of the lid I wrote Annabel's name, and the date of her baptism.  


I also added a super cute Martha Stewart rocking horse fabric sticker to the top.  I hope she cherishes it as much as I enjoyed making it, but if it ends up in a closet collecting dust, I think I discovered a new thing I'm good at making.   


Well I hope ya'll had a great weekend, and happy DIYing, chris!

Wednesday, May 30, 2012

A Pop Of Color


For this DIY I took the white plastic bow hair clip seen in this Photo An Hour, and this outfit post.  I got the barrett as a gift with a purchase from ModCloth.  

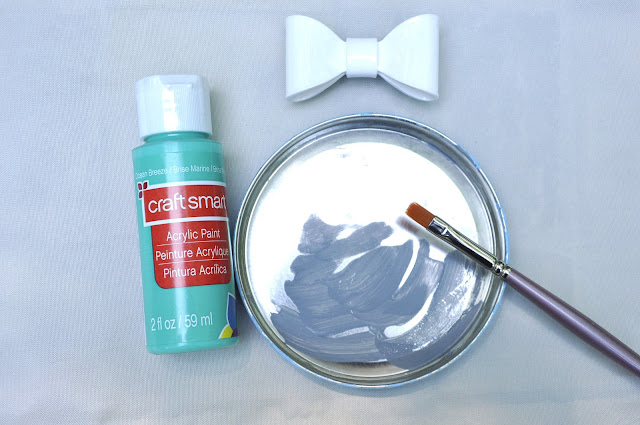
This is the paint and brush I used.  I used that tin lid as a paint tray.  

I painted the middle band, and the inside of the bow for a pop of color.  I needed to paint two coats to cover the white plastic.  I'm not much of an all white kind of girl.  I'm loving this green color recently.  I have tons of things in this color or similar shades, so I thought it would be this DIY.  Any color would look great!  You could even play with making polka dots or stripes.  

Then I varnished the painted areas.  I probably should have used a high gloss since the plastic is so shiny, but I rarely like to use anything but satin. Just my personal taste though.  

This is what it looks like on now.  Yay, totally me.  Hope ya'll enjoyed, happy DIYing, chris!  

Tuesday, May 29, 2012

Sail Away With Me


Today I decided to apply my fabric painting talents to a pair of leggings.  I'm not sure why I've only painted on t-shirts before, but I saw Annika painted some hearts onto a pair of tights over on The Pineneedle Collective, so I thought I'd give it a go on some black leggings.  

Here are the leggings I started off with.  They are great leggings, but I own tons of black leggings, so I thought I'd give these a make-over.  

I started off by sticking blue painter's tape all over my legs while I was still wearing the leggings.  That way I could look at myself in the mirror, and make sure I liked the placement of all the spots.  Then I carefully slipped them off, trying not to remove any of the tape.  

Next, I used a sailboat stencil, and traced it onto foam.  I would have preferred to use foam with a sticky back, but this is what I had on hand.  I made a bunch, because after painting five or more sailboats I'd start having major bleed issues.  If I had foam with sticky backing this probably wouldn't have happened.  

These are the tools I used to paint on the sailboats.  I didn't realize until I was nearly done that the sponge applicator was the best tool.  I usually use a paintbrush, and that's what I started off with, but then I realized I had some sponges I bought for this type of project.  So thrilled I bought these, I will definitely only be using these from now on when I paint stencils.  

This is what they look like finished.  I'm pretty happy with them.  Now I wish it was legging weather!  Well, not really, but these will bring a smile on my face when it gets cold out again.  
Here is what they look like in an outfit.  I almost thought I didn't have anything to wear them with!  Then I remembered this skirt, I haven't worn it in ages.  This style skirt was all the rage last spring/summer.  I guess the mini bodycon skirt replaced this look this year.  Still a totally cute look.

Tank Top -- Kohl's
Skirt -- Boscov's
Leggings -- Macy's
Belt -- Target
Shoes -- Target

Hope ya'll enjoyed!  Happy DIYing, chris!