Showing posts with label acrylic paint. Show all posts

Tuesday, December 18, 2012

A Christmas Card


Today I made a Christmas Card that I plan on sending to my grandparent's.  They're the only people I can be guaranteed wont see it posted on here before they receive it.  I started off by folding a piece of pastel paper in half, and then cut it down to the size I desired the card to be.  Then I cut out an impression of a doily I had made on a homemade piece of paper.  I glued that to the pastel paper.  Then I painted the homemade paper.  


Next I wrote my holiday message across the top in a festive green fine point sharpie.  I also donned the circle of homemade paper with some glitter dots.  

To finish off the outside of the card I added some red bows with a red extra fine point sharpie.  Now my homemade paper kinda resembles a Christmas wreath.  

I like this card.  I hope my grandparent's do too.  Happy DIYing, chris!

Saturday, December 1, 2012

Hand Painted Dough Ornaments


So remember the dough ornaments I made on tuesday?  Well today I started painting them.  I used some acrylic paint, and some block printing ink.  Only because this is the paint I have in the house.  The acrylic paint worked perfectly though.  It dried quickly, and went on easily, but the printmaking ink was a bit thick, and took awhile to dry.  I might consider buying more acrylic paint to finish this project.  

The dino on the left I painted with just the acrylic paint, and the more blue dinosaur I mixed the two colors together.  

Then to make the duo look like a pair I covered them with black polka dots.  I used black fabric paint, and a paperclip to apply the paint.  

He's cute!  I haven't decided yet if we want to spend the money on a Christmas tree yet, but this guy is making me think it might help get us in the holiday spirit.  

A perfect pair.  Just like my hubby and I.  :) That back one is a little sad though.  He can't stand up too well.  Good thing I plan on hanging them up.  I might varnish them too.  Give them a little sheen, and help their paint job last a little longer.  I'm sure there will be more painted dough ornaments leading up to Christmas.  Who knows they might even get to spend some time on a live Christmas tree.  

Hope ya'll are having a great weekend, and happy DIYing, chris!

Sunday, June 3, 2012

Fancy Keepsake Box DIY

I'm home from Vermont, but this thing is still on auto pilot, because today I will be at my niece's baptism.  So I thought it would be appropriate to share what I made for her gift.  I haven't been to many baptisms, and this is the first that I am bringing a gift to, so I really had no idea what to give.  I've heard that bonds are a popular gift, but I figured she'd be getting a lot of those, and I wanted to give something a little more thoughtful.  My next thought was something personalized to commemorate this momentous occasion.  When I googled some ideas for personalized baptism gifts I didn't find anything that struck my fancy.  My family isn't religious, and it didn't make much sense (to me) to give my niece something with psalms, or bible quotes, or a giant cross, which seemed to be my only options.  There is a plethora of non-baby-friendly jewelry, giant crosses, and stuffed lambs as gift choices.  I had a really hard time thinking of anything that is baby appropriate and religious, but not overly religious.  

What I came up with is a suped-up wooden treasure box.  I had one of these when I was a kid, and I loved keeping special little things inside of it.  This gift idea seemed the most reflective of me.  I guess it doesn't have much to do with the ritual, but maybe she can store all her new non-wearable crosses  in it.  Or I imagine she'll be receive lots of pretty jewelry today. 


I bought a small oval shaped wooden box from Michael's, and I used a bunch of scraps of special decorative papers, and applied them to the box with Mod Podge.  


Here is the wooden box after I glued all my pieces down.  Sorry I don't have any pics of the process.  I simple traced the different parts of the box on the pieces I wanted to use, then cut them out.  I played with their placement before I started glueing them down.  Once I started gluing I had to keep going, because I was layering the next piece under the previous piece.  I covered the whole thing with paper and Mod Podge, and then I gave it a couple extra coats of Mod Podge.  


I painted the interior and the top lip of the box with acrylic paint.  They call this color ocean breeze.  I liked using non-traditional girl colors, plus of course a little pink.  All the patterns and colors I picked work perfectly together.  


Once I had enough coats of paint on, and everything had dried for at least twenty minutes I coated the whole box in satin varnish.  I applied three coats.  


To finish the box off, on the inside of the lid I wrote Annabel's name, and the date of her baptism.  


I also added a super cute Martha Stewart rocking horse fabric sticker to the top.  I hope she cherishes it as much as I enjoyed making it, but if it ends up in a closet collecting dust, I think I discovered a new thing I'm good at making.   


Well I hope ya'll had a great weekend, and happy DIYing, chris!

Wednesday, May 30, 2012

A Pop Of Color


For this DIY I took the white plastic bow hair clip seen in this Photo An Hour, and this outfit post.  I got the barrett as a gift with a purchase from ModCloth.  

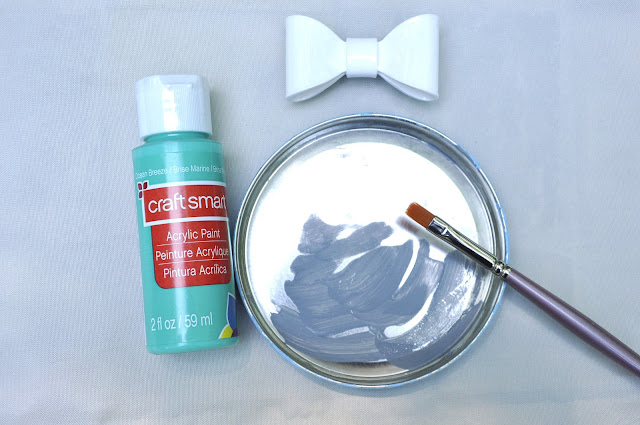
This is the paint and brush I used.  I used that tin lid as a paint tray.  

I painted the middle band, and the inside of the bow for a pop of color.  I needed to paint two coats to cover the white plastic.  I'm not much of an all white kind of girl.  I'm loving this green color recently.  I have tons of things in this color or similar shades, so I thought it would be this DIY.  Any color would look great!  You could even play with making polka dots or stripes.  

Then I varnished the painted areas.  I probably should have used a high gloss since the plastic is so shiny, but I rarely like to use anything but satin. Just my personal taste though.  

This is what it looks like on now.  Yay, totally me.  Hope ya'll enjoyed, happy DIYing, chris!  

Sunday, April 29, 2012

Dog Brooch Make-over


We went to a dog show today, because I love doggies.  I want one soooo sooo sooo bad!  I feel like I've been waiting forever for the right time to get a puppy.  We saw so many cuties today, but the waiting continues, cause you can't buy dogs at dog shows.  Or at least not the two I've gone to. 

When I got home I was inspired to work on my doggie pin DIY.  I've had this dog pin since I was a kid, so I thought it was time for a little make-over.  This DIY is easy as pie, and faster than the road runner!  I used acrylic paint and a small wooden stick, a toothpick would work too.  I keep small tin lids to use as paint trays.

Working from the bottom up, I carefully made polka dots on the little pin.  I made dots in a straight line, and worked my way up, off setting the next line from the previous.  

The paint dried in minutes, and I was able to put it on for some pics!  Actually I haven't taken it off, because I think it's so cute!  

Hope ya'll had a great weekend, and happy DIYing, chris.