Showing posts with label DIY. Show all posts

Wednesday, February 20, 2013

Stick Project


I have this project that has been slow going, and I'm not done yet, but I wanted to share a little of the progress.  I found this stick in my backyard back in December, and I bought it in to be dried out.  I cleaned off any bark that would easily fall off, and then let it hang out in my dinning room.  Cause that's our "work" room right now.  Strange I know, but we don't have a garage, and the basement isn't really a place I want to store anything.  Little less spend much time.  So we're short on project spaces, and we don't have a dining room table yet, and thus it's the project/work room.  Anyway here is my lovely stick.  It's about four feet in length, and I like it's shape and texture.  I think it's from a Norway Maple.  

I have some big plans for this stick, but first comes it's make-over.  A coat of white primer spray paint.  I sprayed one side from as many angles as I could, then flipped it over and got the other side.  I was please with the results.  I thought I'd have to spray on two coats, but I like the way one coat looks so I'll stick with this.  Though I haven't decided if it might be fun to spray it neon green.  I'll have to think more on that, while I prepare the space I want to use it in.  

Sorry it's so short today.  I had a long work day, and didn't get much time for crafting.  Happy DIYing, chris!

Tuesday, February 19, 2013

Wooden Skewer Wreath


I was rummaging around in my craft room today, and I came across this hand full of wooden skewers.  I started playing around with them on the floor, and came up with this shape.

I attached the pieces together by wrapping embroidery thread around them tightly.  I immediately decided this looks like it could become a wreath, so I set to work attaching more pieces.  I started by creating a triangle at one of the points with a new skewer, and attaching it with a dab from a hot glue gun.  

I continued attaching more skewers at every point, until I had a second layer of skewers all the way around.

Then I repeated that over and over until I used up all my skewers.  

I designated a point to be the top, and tied a short strand of embroidery thread, and then hung it on my door.  

I love the simplicity of the way the skewers all nest together.  I might dress this up in some way for spring, but for now I'm going to admire it's natural beauty.  

Happy DIYing, chris!

Friday, February 8, 2013

Fun Friday Fascinations #43


#1.  A DIY Geometric Felt Heart Garland by How About Orange.  Love this garland a whole heck of a lot!  I need to find me some stiffened felt ASAP. 

#2.  Another great Valentine's Day DIY.  This Pom Pom Heart Wreath by Pysselbolaget, if you didn't guess from the blog title the directions are in Swedish.  Though making pom poms are extra easy, so I'm positive I could do this without instructions.  I was actually imagining making a heart with a wire coat hanger, and attaching pom poms is a fabulous idea.  

#3.  Minieco never fails to inspire me with her amazing talents, and her Valentine's Woven Heart Card is lovely.  

#4.  I've been seeing pink hair all over Pinterest, and I love it.  Throw in an amazing fishtail braid and I'm head over heels.  

#5.  This ModCloth dress would be cute for Valentine's Day or a date.  I keep thinking about the colors and pattern on this dress, so cute.  

#6.  Aaron and I like to cook for each other and have a relaxing evening in together on Valentine's, and this Mussels and Squid Ink Spaghetti from Drizzle and Dip looks like the perfect recipe.  

Happy Fun Friday Fascinations, chris!

Saturday, January 26, 2013

Outlet Cover Make-over


Since we moved into our house it's taken me awhile to get back into doing projects specifically home related.  There is a long laundry list of handy home repairs needed to be done.  I got burnt out on all the work I had to do to make this place livable.  Once we settled in I was in full work mode, without hardly a moment to think about working on the house.  Now that I have time I've been overwhelmed as to where to begin.  The recent cold front that moved in, and has been making it feel like winter, gave me a great idea where to start.  We should have done this months ago.  Long before it got cold, but better late then never!  

An important part to a home is making it air tight.  This is important whether you're running the heater or the A.C.  You don't want all your heated/cooled air escaping out of every little crevice.  Air likes to seep out through door and window frames, around outlets, and baseboards.  We removed most of the floorboards and outlet covers months and months ago.  All of the outlet covers needed to be replaced, and I just kept putting it off.  I knew I would buy the least expensive white option, which meant it would be an ultra boring shopping trip.  It never seemed like something worth going to the hardware store for on it's own.  The other day we found ourselves there buying a snow shovel, so we also picked up some outlet covers.  We have this one wood wall, and the white outlet cover looks horrendously out of place.  


So I used this DIY tutorial from The Plumed Nest to cover the outlet cover.  As the grand-daughter of an electrician, I have to wonder if gluing paper around my electrical outlet is a good idea, but what the heck!  We don't use this outlet anyway, so why not make it decorative?  I began by finding a scrapbook paper that would blend well with this wall.  Then I cut it out about a half inch larger than the outlet cover.  

  Then I applied Mod Podge to the outlet cover and laid it down on the backside of the paper.  I folded the sides in first, and Mod Podged them down.  I cut slits at the corners, and trimmed off the triangles to make them fold in nicely.  For the holes I cut 'x's across them, and folded the triangles in.  Then Mod Podged the flaps down.  I finished by coating the whole thing in a thin shellack of Mod Podge.  

Doesn't it look better now?  


I'm also happy I found a use for this paper so I can enjoy it on a daily basis.  Oh, and speaking of that electrician, today is his 85th birthday!  Happy birthday G-Dad, and Happy DIYing, chris!

Friday, October 12, 2012

Fun Friday Fascinations #26


#1.  Missie Krissie's tutorial for a lovely Leather Leaf Necklace looks amazing.  The instructions look simple, but yet the end result is this stunning statement necklace.  Perfect for the fall.  

#2.  Henry Happened made some cute Clay Disc Earrings.  I've been wanting to use clay in a DIY project.  I used to make tons of jewelry with it when I was in Girl Scouts.  Maybe this is just the top of project to get me back into it!

#3.  I Love To Create whipped up a fantastic halloween themed DIY T-shirt.  Love this dip dyed look with the full moon and bats.  Ya know how much I love to combined dip dying and stenciling on a t-shirt, so this tutorial is just calling my name out.  

#4.  Another halloween inspired DIY by Lacquer and Linen.  I know we've all seen painted pumpkins before, but these are simply marvelous.  I love the chain on the ghost, and even the bling is awesome, and I am so not a bling kinda girl.  

#5.  Made With Love shares how to make your own notepad by hand.  One of my college printmaking teachers would do this with all the scrap pieces the students would throw away.  I still have one kicking it around, but I've been thinking I need a new homemade notepad.  

Well that's it!  Have a lovely weekend, and happy DIYing, chris!

Tuesday, September 25, 2012

Tombstone DIY Part 2


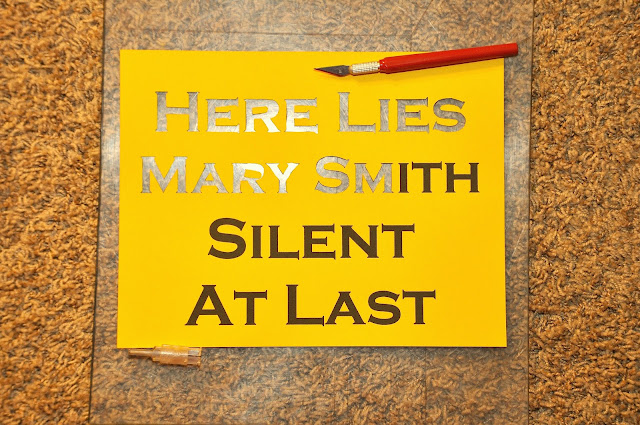
I worked more on my Tombstone DIY when I got home from work today.  I searched the internet for some good headstone epitaphs.  Then I found some decent gravestone type faces, and worked on the font sizes that would make for the best design.  Finally I printed them out on some card stock paper, and set to town xacto knifing the letters out.  

After an hour and a half I broke the tip off my blade, and only made it through four and a half of the seven words, on one of the tombstones.    I pressed the knife to hard into the plastic I was leaning on, and that's why it broke.  I have back up blades, but I didn't feel like digging them out.  Plus it's getting late, and I have another early work day tomorrow. 

This is the longest epitaph I found.  I hope I find the time to cut it out, because it would look great spray painted on there.  

Have a great night, and happy DIYing, chris

Saturday, September 1, 2012

August Wrap-Up


Another month gone by.  Summer is nearly done now, and fall is approaching.  A couple days ago I could sense autumn in the air.  It was dusk, and there were leaves blowing around on the street, and kids were playing on the corner.  There was an urgency to their play, knowing that soon enough it will be too cold and dark out after school to play outside.  Usually when I start getting the beginning-of-the-school-year-jitters there is a crispiness to the air around dusk, but not this year.  The days are still in the nineties, and we are luck to get a bit of relief in the high seventies in the evenings.  The humidity is high, and the mosquitoes are biting.  

Today I'm interrupting my weekly This Is Me with my August Wrap-Up.  I've managed to fit four more This Is Mes into this month, #9, #10, #11, and #12.  I think the twelfth one is my favorite from this month.  I pinned this drawing of mine from that posting, and whenever I see it I'm impressed.  I know that must sound tremendously cocky, but I'm rarely overly proud of anything I create.  So when I am please with something I've made I want to scream about it from the roof tops.  I'm super picky, and I always try to be my toughest critic.  

I've been busy with DIYs this month!  Which I'm super happy about.  I'm loving the Tri-colored Braided T-shirt Bracelet I made this month the most, but my Bleach Dip-Dyed Tank Top, and my wide upcycled Fabric Bracelet are tied for a close second.  I also made cute tiny Button Earrings, a Hair Bowtie made with ribbon, and I started getting ready for Halloween with some paper Black Rats.  

You can also check out one of my other bleach dip-dyed creation in this Outfit Post.  Which also happens to be be the only outfit post I made this month!  

Though I did share two hair-do photos, my favorite being my summer look, the Braided Crown.  I also showed how keeping your hair in a messy bun during the day can result in lush Voluminous Locks for the evening.  

I also shared two cute nail-dos in August.  My Pink Polka Dot do wins hands down, but my Sun Kissed Nails are delightful too.  

Aaron and I traveled up to New York for our buddy Derick's (unisex) Bachelor Party.  We had an awesome time with live music, good food, great friends, and fun ShotSkis!

Speaking of drinking, I've whipped up five new drink recipes this month!  I've been drinking a nonalcoholic version of my End of Summer Cocktail since the first night I mixed that refreshing drink up.  I've made a couple different white rum cocktails this month, a Cherry Rum drink, and a Kiwi & Cherries Cocktail.  I also made two sweet chocolatey milkshakes, a Peanut Butter Nutella Snicker Smoothie, and a Buckeyes Coffee Milkshake.  

Mmm Peanut Butter ... I'm still day dreaming of the Peanut Butter Pie I made near the beginning of August.  Is it too soon to make again?  I've also whipped up a couple zucchini recipes, Sautéed Zucchini, and Parmesan Zucchini Chips with a Creamy Caesar Dressing.  Another snack recipe I came up with was a Cheesy Pretzel Apple Snack.  

In addition to all these lovely things I've posted, and working (nearly) full time, I've been working every chance I get on our house.  Things are finally coming together.  Most of the downstairs is painted, and we've refinished our hardwood floors.  They are looking beautiful all aglow.  I can't wait to move in already!

So that's what I spent my August working on!  I'm excited for this new season, and all the changes it will bring.  What is your proudest creation from August?  Are you ready for Autumn?  Happy DIYing, chris!  

Wednesday, August 22, 2012

Fabric Bracelet


Hey all!  Today I'm making a fabric bracelet.  I wear it as part of my work uniform, because I have to cover up my wrist tattoo.  I've made this bracelet before, but not for the blog, and my old one was stolen!  I used to get tons of compliments from the kids I photograph, when I wore this bracelet.  I knew with the beginning of this season I needed to make a new one.  I use an old polo shirt that was my mom's from when she was my age.  It's a great way to keep this old favorite around, even though it's gotten worn out, and doesn't look so great as a top.  

To begin I used a section that had a hem on two sides, and cut out a piece about 7 inches by 4.5 inches.  I folded the long side in, and pinned down to hem that edge.  

Then I folded the piece in half with the stitch side of the hems up. I sewed the ends together.  I consistently stitched the needle through the same side of the fabric, and made a tight loop over the ends.  This binds off the end, and makes for a neater and softer finish.  

Here is the finished result.  I love the soft old fabric.  This took me about two hours to sew by hand, while talking, watching TV, and snacking.  A great couch activity.  

I hope this bracelet gets as many compliments as it's predecessor.  Have a lovely day, and happy DIYing, chris!  

Wednesday, August 15, 2012

Tri-colored Braided T-shirt Bracelet


Another DIY I left until the end of the day, but I'm really happy with the results of this crafty project I threw together.  I made a tri-color braided bracelet.  

I used three different t-shirts in yellow, orange, and blue.  I love these colors together, they complement each other so well, and they're unisex!  I used scissors to cut three strips of each color.  The strips each measured a half inch wide, and eight to ten inches long.  I used the needle and thread to sew the strips together at the beginning and end.  

I also sewed all three colors together, and then I braided them together.  At the end I sewed the two ends together.  I left the different length ends, because they add a fun flare.  Like a mini pom-pom.  When sewing the ends make sure to go through all the strips of fabric, that way it's nice and secure and wont come unraveled.  

A simple craft, with great results.  Anyone could do this with some extra fabric, and twenty minutes to spare.  I'm fairly certain of seen similar bracelets at Forever21 sold for around five bucks.  This only cost me time. 

I'm thinking up an outfit to wear this with, and when I'll have my next chance to show off my latest creation!  I wear my DIYs proudly, and it makes my day when someone complements them.  I work with children, and it's the highest complement when one of them tells me my bracelet is cool.  

What's your latest creation?  Do you love to show it off?  Have a lovely day, and happy DIYing, chris!  

Tuesday, August 14, 2012

Button Earrings


O. M. G.  This morning I left for work at 8:30AM, and I only got home for the day at 9:45PM!  I left work at one, but I had to go to my house, and hang out while some contractors did some work.  Such a long day, and I only ate a small lunch this afternoon.  I didn't realize they would work for so long, and didn't plan to do my DIY until I got home.  Obviously when I got home I needed to eat, and by then it was ten thirty.  So needless to say today's DIY is beyond simple. 

I used these super tiny buttons to make post earrings.  

I simply hot glued them to the head of an earring post.  You can buy earring posts for jewelry making at Michael's.  Or at least that's my go-to-craft-supply store.  I love mixing and matching the different colors. 

See how tiny they are, aren't they cute?  I actually made this pair a long time ago, and they've held up pretty well.  I want to make more, but I might use an epoxy instead of hot glue to attach them to the earring posts.  I think epoxy will hold up longer, and will be easier to get a nice clean finished look.  

Hope ya'll are having a great tuesday, and happy DIYing, chris.