Showing posts with label embroidery thread. Show all posts

Wednesday, June 20, 2012

Wide Macramé Bracelet Part 2


Oh man, hello Summer!  The high today for my area is 101ºF!!! Whew-wee, it's hot out there.  I didn't let the heat hold me back, I didn't delay!  I got the macramé bracelet I started yesterday finished.  To see the first half of this tutorial, check out yesterday's post.  Now on with how you'll finish off this bracelet.  


I periodically tested the bracelet around my wrist, and once I reached my desired length I began tying the last row onto the jump links.  The last row has to be a row that includes the first string in the first knot.  Other wise you'll have a lose end.  

I have twelve strands, so I tied four on each of my three jump rings.  

When I was done tying on all the embroidery threads I tested the bracelet out, and made sure I could easily attach the hook.  The first time I had to remove the jump rings, and add a couple rows.  I tested it again, and it was perfect, that's when I trimmed the long tails off.  My guess for 56 inches of thread to begin with was a bit off, at  least it didn't mess up the project.  I just need to figure out what to do with all these thread scraps.  :)  

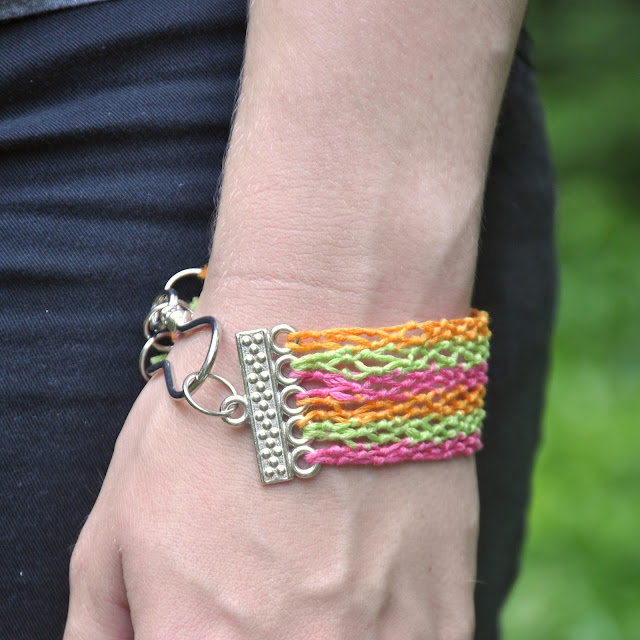
I like the way this bracelet sits on my wrist, and the clasp is lovely.  

Of course I love the colors too.  :)

 I'm totally enjoying this technique.  I want to make a ton of these.  I'd like to try better thread, and find a bead that would work, and play with different clasps.  I guess there are only so many of these I need though, I wonder if my female family members would want one?  I wonder if strangers would be interested in buying them ...  I'd totally enjoy making a ton of these.  I love playing with all the colors, and there are so many different materials I could try out.  

Well I'm off to make up some more fun things.  Hope you're having a lovely day, and don't let the sun burn you out!  Happy DIYing, chris.  

Tuesday, June 19, 2012

Wide Macramé Bracelet


I finally put together a DIY tutorial for my simple macramé bracelet.  After showing you a glimpse of it in my most recent Photo An Hour (Part 1 & Part 2), and my outfit post from this past Sunday, I figured I was past due for a tutorial.  

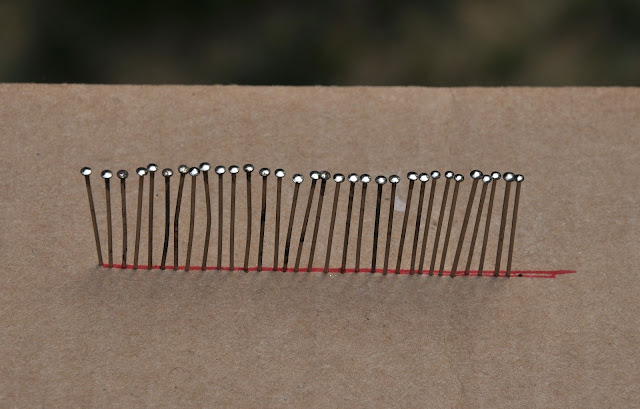
I started off by drawing a straight line on a piece of cardboard, and then sticking 32 straight pins as close together as possible on the line.  The number of pins you need will be determined by how wide you'd like the bracelet to be.  This will become more clear once we begin.  32 pins will make a bracelet that is about 3.25 inches wide.  For this tutorial I will only be using 12 of the pins, to make a bracelet that is about one inch wide.  

Gather together embroidery thread, and a clasp.  I am using three colors for this project, for the wider bracelet I used four, but it is completely up to you.  I am using a five loop closure, that I bought at Michael's.  On the wider bracelet I made, I used four toggle clasps.  I thought about using some acrylic beads, but once I started I decided they were too big for this project.  

Now measure out each strand for the bracelet, and wrap one strand around one pin.  The middle of the embroidery thread should be touching the pin.  

Since I made up this tutorial out of my head, I guessed how long they should be.  My guess is 56 inches, but I never measured the threads for my first bracelet, and I lucked out with decent length tails.  How I guessed the length, was I figured it should be one and a half times longer than the length I would need to make it around my wrist.  Without the toggles my first finished bracelet measures six and a half inches.  

This is what it looked like once I measured out all the embroidery thread, and wrapped them around each individual pin.  I placed two threads of the same color next to each other, going from orange, green, and then pink, and repeating that pattern.  

Now, let's get down to the actually bracelet making! Start by running your first strand through the first loop on the five loop clasp, and make sure the thread is perfectly doubled in half, and tie it in a tight knot.  Do the same thing with the second strand in the first loop.  

Continue tying each strand to a loop on the clasp.  For twelve threads and five loops, I ran two through the first, three through the second, two through the middle loop, three through the fourth hole, and two through the last loop.  

Moving on to the next row.  Skip the first thread, and tie the second and third strands together.  

Keep tying the strands next to each other together, until you get to the end.  There should be a lose thread on each end.  Now you have the technique down!  The third row will be the same as the first two, and the fourth row will be the same as the second row.  Keep repeating this until you reach the desired length.  

I will share in another tutorial how to finish this bracelet off.  This is how far I got before my ADHD got the better of me, and I needed to find a new project. 

Well, I've had a long enough break now, and it's almost dinner ... err, I just ate dinner, and walked the dog.  So back to making knots, and watching more Sister Wives.  Hope ya'll enjoyed, and happy DIYing, chris.  

Friday, March 23, 2012

Friendship Bracelet

Happy Friday!  For this Friday Flashback I wanted to make a friendship bracelet.  I used to make bracelets with embroidery floss and hemp all the time when I was a pre-teen.  When I bought my supplies for my owl elbow patches, I found a great deal on embroidery thread.  Which was a big reason I wanted to make a friendship bracelet, all those colors were calling my name.  I checked on the internet for a tutorial on how to make friendship bracelets, it's been ages!  After checking this out, I was good to go.  
Start by laying all your strings out in the order you want the colors to stack.  The strings on the left will stay on the left, and the strings on the right will stay on the right.  

It was a little rough in the beginning, but it's starting to look pretty cool.  Always start with the outside string, and move to the middle, and keep the colors divided in half the whole time.  Tie two knots on each string.  When tying knots on the left always have the tail going to the left, and do the opposite for the right side.  

In the middle tie one knot to the right, and then another knot to the left.  Now you can move back to the most outside string on the left, and start your next color.  

After I got going I realized I've used similar colors in tons of previous projects.  These were more or less the colors I used in my wedding.  As seen in the handmade paper spiral flowers I used as part of my center pieces.  

This how I painted my bedroom at my parent's house back in 2003.  I still love the way that room turned out, as you can tell by the above photo.  I'll be sad on the day I have to paint it back to white.  

Well, that's all I have for you today.  Have a great weekend, and happy DIYing!  I'll be back tomorrow with my Saturday Blogger Love post, chris.

Thursday, March 22, 2012

Owlbow Patches and an Outfit Post

This past fall I noticed elbow patches were coming back in style.  Urban Outfitters has a cute yellow sweater with yellow patches, and ModCloth has a casual grey cardigan with faux leather elbow patches.  Then around Valentine's Day I noticed these heart elbow patches going around the internet, and they got me thinking ...  I want some elbow patches! 

BUT I wanted something different from what I was seeing out there.  I had this little idea in my head so I googled it "owl elbow patches", and the first hit I got was The DIY Mommy's elbow patches for a little boy's cardigan.  Cute, but not exactly what I was looking for.  Then I dug a little deeper into the interwubs, and found Bugs and Fishes' stuffed Felt Owl.  Though I didn't want to make a stuffed owl, I loved the way she designed her owl.  She has a great printout template, but I made my own instead.  I changed the nose up a little, but otherwise I kept him the same.  

I love how they turned out!  You can definitely tell my embroidery skills improved with the second owlbow patch.  Ha!  To see my beginnings you can click here.  I had a little trouble getting the first one in the right spot.  Which I didn't realize until I was just about finished stitching him in place.  On the second one I had a little trouble with bunching, but this didn't require me to remove as many stitches.  Aren't they cute?


What I'm Wearing:
*necklace from American Eagle (one of my favorite lady pal's gave this to me!)
*top sweater (with elbow patches) from Boscov's (it's a local department store, I bought the sweater for work.  The flower is covering up my work's logo)
*bottom sweater and dress from H and M (and you can't see, but I have a tank top on from them as well)
*slip is vintage
*I have two pairs of stockings on, and I'm not sure where either of them are from.
*boots from Bed Bath and Beyond (crazy, huh?)
*white flower pin is from Claire's, it also doubles as a hair clip.  I love it when I own something that has dual purposes!   

Happy DIYing, chris!

Wednesday, March 14, 2012

Spring has Sprung!

Aaron and I went for a walk today.  We couldn't pass up another one of these beautiful days without spending some time in the sunshine together.  It was a pretty short walk though, because I kept stopping to take pictures.  
This is what the woods around us looks like.  It's beautiful even in the winter.  I love the big rocks everywhere.  When we lived out in California (where the hubby's from), I missed these forests everyday. 

Aaron posed while I worked on the camera settings for him to take some pics of me.  Aaron has the opposite problem with pant buying from me.  His pants and long sleeved shirts tend to be too short.  He's a tall dude at six foot four.  
He took this photo.  Spring has sprung!  

I love to take close up pics of rocks.  I could fill a computer with just images of rocks.  

We parked right next to this horse farm.  I used to live two doors down from this place from thirteen to seventeen.  

So many flowers out right now!  I'm okay that our winter was light this year, because it was ridiculous the year before.    

I also worked on my owl patch today.  I had to remove the elbow patch from the one arm and reattach it, because I had let it slide off place while sewing it.  I'm kind of glad I did though cause I decided to add another layer of the body felt for some extra strength.  The placement seems to be much better now too.  I think starting on the bottom instead of the top helped too.  Well I want to get back to sewing those guys on.  I'll catch ya'll later, happy DIYing, chris!

Thursday, March 8, 2012

Owlbow Patches

I've had these Owlbow Patches on my mind since the beginning of February.  I finally got them started today!  
I began by drawing out the template for the owls on card stock.  I drew the body, and then cut it out and kept tracing the body to draw the other parts in.  Then I cut out each piece, so that I would be able to trace the same template twice.  

Now I used card stock templates to trace the parts out on felt in different colors.  I used eight different colors.  I laid them all out as I went, to make sure they looked good.  To keep everything in place I used embroidery thread, before I started sewing though I used a little glue to help keep things from falling off track.  I sewed the small black circles to the large grey eye circles with green thread first.  Next I sewed on the nose with white thread to match the nose felt, and the same for the bottom belly piece.  

For the belly I started at the bottom, and only sewed a straight line across the top.  Except for the top belly felt I tried something more playful.  

I liked the look of the lighter thread on the top stomach piece, so I followed that trend on the wings.  I only sewed the inside, because the outside with be sewn when I sew the patch to my sweater.  

Once I was ready to attach the patch I put on the sweater I was attaching it too and used four pins to secure the patch in place.  

This is how much I was able to get sewn today.  I still have a lot to go!  I hope I'm able to finish this project over the weekend.  I need to go to bed though, because I have an early day tomorrow.  Happy DIYing, chris.

EDIT:  Just wanted to check in to show how the elbow patches turned out.


Saturday, January 21, 2012

Thanks Honestly ... WTF.

I borrowed today's DIY from one of my favorite blogs Honestly ... WTF.  I tried out Erica's DIY Woven Chain Bracelet.  I recently received this purse from Mod Cloth:
Sorry, this little gem is no longer available.  
I love the purse, but chain seems to just get in the way.  After seeing Erica's post I knew I'd have to try out her bracelet idea with the chain from my purse.   I easily enough pulled the leather bit that was looped through the links off the chain.  Then I removed three links, and reattached the clasp.  I also measured out my embroidery thread, and knotted my three colors together.  Then I used a safety pin and a paper clip to hold my thread down on a pillow.  

Now this is where I started following Erica's directions.  I'm going to direct you over to her site, cause she already did a great job writing out the how-to.

This is what my finished bracelet looked like on.  I want to try this again with a different type chain, and to play more with my colors.  

Happy DIYing!

P.S.  I added an 'About Me' Page, check it out!