Showing posts with label sewing. Show all posts

Thursday, March 8, 2012

Owlbow Patches

I've had these Owlbow Patches on my mind since the beginning of February.  I finally got them started today!  
I began by drawing out the template for the owls on card stock.  I drew the body, and then cut it out and kept tracing the body to draw the other parts in.  Then I cut out each piece, so that I would be able to trace the same template twice.  

Now I used card stock templates to trace the parts out on felt in different colors.  I used eight different colors.  I laid them all out as I went, to make sure they looked good.  To keep everything in place I used embroidery thread, before I started sewing though I used a little glue to help keep things from falling off track.  I sewed the small black circles to the large grey eye circles with green thread first.  Next I sewed on the nose with white thread to match the nose felt, and the same for the bottom belly piece.  

For the belly I started at the bottom, and only sewed a straight line across the top.  Except for the top belly felt I tried something more playful.  

I liked the look of the lighter thread on the top stomach piece, so I followed that trend on the wings.  I only sewed the inside, because the outside with be sewn when I sew the patch to my sweater.  

Once I was ready to attach the patch I put on the sweater I was attaching it too and used four pins to secure the patch in place.  

This is how much I was able to get sewn today.  I still have a lot to go!  I hope I'm able to finish this project over the weekend.  I need to go to bed though, because I have an early day tomorrow.  Happy DIYing, chris.

EDIT:  Just wanted to check in to show how the elbow patches turned out.


Friday, February 3, 2012

Kitty Window Perch

For today's DIY I wanted to do something for my cat.  She loves to look out the window, but there aren't any great kitty perches in the rooms she likes to occupy.  i wanted to put up a shelf for her, but I wanted to add some padding so it would be soft and warm to sit on.  This project cost me a total of three dollars!

WHAT YOU'LL NEED:
- Small Ikea shelf
- 2 Ikea shelf brackets
- 1 Urban Outfitters' reusable shopping bag
- Batting
- Needle & thread
- Scissors
- Staple Gun
- Proper screws and screw driver

Directions:
Start by folding your batting to fit over your shelf.  Double it over once or twice to make a soft cushion.  Then center inside the Urban Outfitters' reusable shopping bag.  Stitch along the seam to hold the batting in place.  Now fold the handles in, and sew the top closed.  

Place the bag pillow on the ground, and center the shelf over it placing it down on top of it.  Pull the sides of the bag around the side facing you, and staple down both edges.  If you  have trouble with the staples going through, use a hammer to finish the job. 

Now attach one of the ikea brackets an inch from the end. 

Next attach the other bracket.

Finally, attach the shelf under the window with the proper screws and screw gun.  Use the window to keep it level.

Now you kitty can enjoy!

Look outside and look oh so cute.

Or easier head level kitty lovin'!  

Hope you enjoyed!  Happy DIYing!

Tuesday, December 20, 2011

Pom-poms and Glitter glue!

      Today I added some glitz to the stocking I made a few days ago.  I thought a pom-pom would look fabulous on the hanger-loop.  And of course I wanted to personalize it with my nieces' name.  That way Santa know's it's her's!  I didn't want to go too overboard, so I left it at that. 
WHAT YOU'LL NEED: 
- Yarn
- Scissors
- Cardboard
- Pencil
- Glitter glue


Directions:
       Use a round cup that is around 3.5 inches in diameter, and trace four circles onto a piece of cardboard.  In the center of two of the circles draw a smaller circle, then draw two lines about 1/4 inch apart coming down from the inner circle to the outer circle.  Cut out all four larger circles.  Now take the two circles you drew the smaller circles on, and cut out the smaller circles including the notch you made in the outer doughnut.  Place one of the doughnuts down with the cut-out facing you.  Cut a piece of yarn about 12 inches long, place the piece of yarn on top of the doughnut going around the inner circles, with the two ends coming down where the notch is.  Then place the other doughnut on top of the first doughnut, sandwiching the yarn in-between. 


       Now start wrapping yarn around both pieces of cardboard.  I started in the center with the end on outside edge coming down the front, then wrapping around the backing.  Continue wrapping to the right, when you reach the end go back over the right, then down the left.  When you reach the bottom of the left side come back up to the center, and end here with the tale on the outside edge.   

      Next place the whole thing down and with one hand hold the piece down, then run the scissors between the two pieces of cardboard at the top edge cutting the yarn.  Once you've cut all the way around tie the 12 in. length of yarn tight, make as many knots as you feel necessary.  Remove the cardboard doughnuts.  


     Take the two cardboard circles you haven't used yet, and sandwich the yarn between the two.  Pin the cardboard in place with your largest needle in the center.  Trim any of the strings that seem too long.  

     Remove the cardboard, and then fluff up the pom-pom.  I used the tail to tie the pom-pom onto the stocking.  

     After all that hard work I played around on a piece of scrap fabric that matched the stocking.  I used my favorite tool - glitter glue, and tested the way the different glitter looked on the fabric, and with the font I used looked.  I picked my favorite look (with some help from my husband and mom), and wrote out Annabel's name on the stocking.  

Friday, December 16, 2011

Christmas Stocking

We have a new family member this year, little Annabel (my niece) was born November first.  Thus we need a stocking for her!  Instead of going the easy route (and buying one), I decided to make her a stocking.  I've never tried this before so I learned a lot along the way, but the end result is lovely.  

WHAT YOU'LL NEED:
  • 2 different types of fabric (about 2 ft. square)
  • Batting (about 2 ft. square)
  • White faux fur material ( about 2 ft. long, 4 in. length)
  • Ribbon (4 in)
  • Scissors
  • Marker
  • Needle & thread
  • Straight pins

Directions:
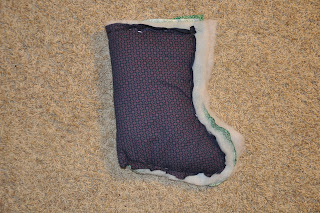
      Fold your fabric in half, and use an old stocking as a template.  Place the heel of the stocking against the fold in the fabric, and begin tracing.  After tracing the stocking cut out both pieces of fabric.  Now flatten out one of the pieces you've just cut out and use it to trace out the batting.  Once you've cut out the batting, you can cut the white fur for the top cuff, and the ribbon for hanging the stocking. 
     Now you'll want to layer all your pieces together.  First you'll start with the fur trim, fur facing down, then the ribbon folded in half in the center.  Then the fabric for the interior of the stocking with the front facing down.  Then the batting, and then the outside fabric facing up.  You'll want to pin the whole stocking together now.  Make sure at this point that you've layered everything correctly, remembering that you will be turning it right side out after sewing.  
      Now you can start sewing, begin going across the top with the stocking open flat.  Once you've finished the top you will fold the stocking in half and re-pin it together.  Now sew the whole stocking together, making sure to go thru all the layers as you go.  Once you are done turn it right side out.  


      Congratulations, you just made your first Christmas stocking!


Check back tomorrow, we'll be adding a little more glitz to this stocking.  Until then, happy DIYing!