Showing posts with label yarn. Show all posts

Tuesday, November 20, 2012

Giant Candle Make-over


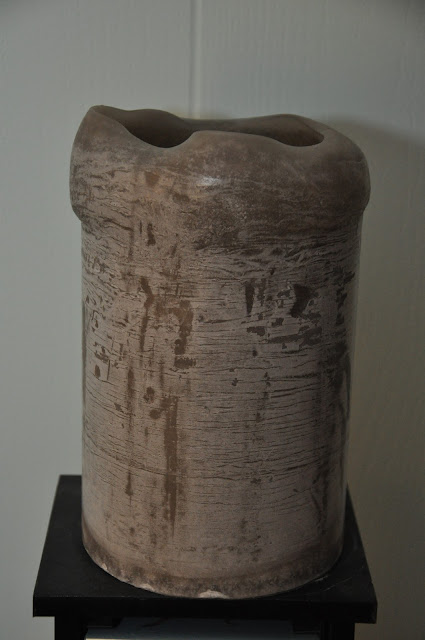
I have this giant candle my lovely husband got from work, Pier1 awhile ago.  It's cool because it's giant, and he got it for extra cheap, which giant candles never are, but otherwise it doesn't have any pizzazz.  It's this weird nondescript color and strange texture, so it just sits there calling no attention to it's self.  

So today I came up with a lovely solution.  I Mod Podged some orange yarn to the bottom of the candle.  It was super easy.  Getting started was the hardest part, and then it only took about five minutes to complete whole thing, including clean up.  I began by painting Mod Podge along the bottom in a thin line, and immediately applying the yarn.  I did the first two rows of yarn in small stretches, with the candle on it's side, rolling it as I moved along.  Once I got the first two rows done I stood the candle up and painted about an inch of the candle with Mod Podge, and quickly applied the yarn.  Then I repeated once more with another inch of Mod Podge.  Once I covered all the glue with yarn, and had reached the desired height I snipped the yarn, and painted the end down with Mod Podge.  


I love how great this looks.  The orange yarn really complements the nondescript color perfectly, and makes this candle awesome.  Plus it's totally dressed for Thanksgiving day now too.  :)  Yay!  Happy DIYing, chris!

Thursday, May 3, 2012

Handmade Card


Trying to stick to my goal this month on posting more DIYs, so here is the birthday card (with envelope!) I made for Aaron.  I've made a variation of this before.  I got the idea from The Ultimate Cardmaker, which is a fantastic book on card making.  If you have any interest in cardmaking this book is a must buy.  This book will generate enough inspiration for years and years of card making.  

The book suggest using teabag folding papers.  I had never heard of that type of paper the first time I made this card.  Of course I googled it, and so I decided to cut origami paper into 1.5 inch squares.  
Step 1:  Cut origami paper into 1.5 inch squares.  You'll need 7.  
Step 2:  Fold the squares in half both ways.
Step 3:  Fold the squares on their diagonal.  
Step 4:  Pinch the middle in, and flatten into a triangle.  
Step 5:  On one side fold the the triangle arms under, making a square in the middle.  On the other side fold the tips that are sticking out back.
Step 6:  Make seven of these little guys.  For some reason only six made it into this photo ... opps.  
Step 7:  Now start attaching the seven squares together.  Begin by folding half of the top square back, and apply a quick drying glue.  Weave the next piece in by placing the triangle flap over your glue splotch, and press the top flap over the piece you placed over the glue.  
Step 8:  Keep repeating this process.  I found it was best to layer moving in a counterclockwise motion.  
Step 9: This is what it should look like before you slip in the last piece.  
Step 10:  Place the last piece the same way you did the other pieces, and then glue the other side in, but layer on top of the first piece.  
Glue the paper medallion down on a long card.  I made my card by folding some handmade paper in half, and taking a couple inches off the bottom.  I glued some twine and yarn under the bottom to make it kind of look like an award.  In the book they use ribbons, and I did that the first time I tried this, and it looked awesome too.  
When all the ribbons or string/twine are in place hot glue a button to the center.  Now you're card is complete.  I stamped 'happy birthday' across the top, and wrote a little love note on the inside.  

Now for making an envelope.  Once you learn this technique you can make an envelope for any handmade card, no template necessary.  
Step 1: Get a piece of scrapbook paper, and trace the card in the center of the paper.
Step 2:  Measure the width of your card, divide that number in half and then add a half inch.  Measure that distance away from the long outside edge.  Draw a line, and then using our ruler angle in from the corners.  For the short ends, measure 2.5 inches up, and draw a line, and then angle in from the corners again.  
Step 3:  Cut the envelope out.  If you wanted to line the inside of the envelope now would be the time.  
Step 4:  Place the card face down over the center, and fold the bottom flap up.
Step 5:  Fold the sides in.
Step 6:  Run a line of glue down both edges of the bottom flap, and smooth the side flaps down.  Then add a line of glue to the right side flap edge, and smooth the left flap over it.  
Step 7:  Now glue the top flap down.  You could also use a sticker to close it, or if you are into wax seals that would be super awesome.  
Step 8:  Finish off by stamping 'happy birthday' on the front of the envelope.  Now you're done!  

Hope ya'll liked this DIY, and happy DIYing, chris.

Sunday, February 12, 2012

Ideas for Handmade Paper

I started today off by finally finishing my crayon heart valentine's!  Yay, now I'm ready for tuesday, and I won't have to worry about it after work tomorrow!  


Now I want to get back to talking about handmade paper.  Today I want to focus on some idea's of simple things you can do with your paper.  
This first set of papers is a mix bunch.  The upper left paper isn't handmade, I included it because the paper below it is handmade and the effect used on it is a direct result of the paper above it.  I used a sheet of glass, rolled out blue ink, and laid four lace doilies down, and then the store bought paper.  I pressed the items together, and then peeled them apart.  I then reused the glass sheet without doing anything to it on a piece of handmade paper.  The same technique was used on the paper on the upper right corner with yellow paint.  In printmaking the second pull is called the ghost image.  The orange white paper was a happy accident!  In the past I used paper couching sheets to dry my paper, and when one of my sheets had reached the end of it's life it dried it's self to this lovely orange paper I had made.  I enjoy the color and texture of this paper, so I didn't reclaim it for other papermaking ventures.  Here is a close up of the four sheets:

The next four are examples of different way's of using small lace doilies.  The sheet in the upper left is the first pass of the glassed used in the previous group of papers' yellow sheet.  The lower two sheets I used string and yarn in the pulp mix.  The paper on the bottom right I used a mixture of different paint to fill in the doily and make it pop off the sheet a bit more.  
Here is a close up of the doily paper with blue string:
Here is a close up of the handmade paper with yarn and the doily I painted in:

On this set of handmade papers I used a large lace tablecloth to press the sheets against while they were drying.  I also used yarn in the pulp mix for these papers.  
This is a close up of my favorite paper:


That's all on papermaking for today!  I also started working on my DIY for Valentine's Day.  I hate to spend money on Valentine's Day, cause I think it's a made up holiday for the card and chocolate companies.  Plus I think it's a lot more heartfelt, if non of my gifts are store bought.  My gift is going to be 52 different date ideas.  I have a fun way to put it all together, but I'll talk about that tomorrow!  Happy DIYing!      -chris

Tuesday, December 20, 2011

Pom-poms and Glitter glue!

      Today I added some glitz to the stocking I made a few days ago.  I thought a pom-pom would look fabulous on the hanger-loop.  And of course I wanted to personalize it with my nieces' name.  That way Santa know's it's her's!  I didn't want to go too overboard, so I left it at that. 
WHAT YOU'LL NEED: 
- Yarn
- Scissors
- Cardboard
- Pencil
- Glitter glue


Directions:
       Use a round cup that is around 3.5 inches in diameter, and trace four circles onto a piece of cardboard.  In the center of two of the circles draw a smaller circle, then draw two lines about 1/4 inch apart coming down from the inner circle to the outer circle.  Cut out all four larger circles.  Now take the two circles you drew the smaller circles on, and cut out the smaller circles including the notch you made in the outer doughnut.  Place one of the doughnuts down with the cut-out facing you.  Cut a piece of yarn about 12 inches long, place the piece of yarn on top of the doughnut going around the inner circles, with the two ends coming down where the notch is.  Then place the other doughnut on top of the first doughnut, sandwiching the yarn in-between. 


       Now start wrapping yarn around both pieces of cardboard.  I started in the center with the end on outside edge coming down the front, then wrapping around the backing.  Continue wrapping to the right, when you reach the end go back over the right, then down the left.  When you reach the bottom of the left side come back up to the center, and end here with the tale on the outside edge.   

      Next place the whole thing down and with one hand hold the piece down, then run the scissors between the two pieces of cardboard at the top edge cutting the yarn.  Once you've cut all the way around tie the 12 in. length of yarn tight, make as many knots as you feel necessary.  Remove the cardboard doughnuts.  


     Take the two cardboard circles you haven't used yet, and sandwich the yarn between the two.  Pin the cardboard in place with your largest needle in the center.  Trim any of the strings that seem too long.  

     Remove the cardboard, and then fluff up the pom-pom.  I used the tail to tie the pom-pom onto the stocking.  

     After all that hard work I played around on a piece of scrap fabric that matched the stocking.  I used my favorite tool - glitter glue, and tested the way the different glitter looked on the fabric, and with the font I used looked.  I picked my favorite look (with some help from my husband and mom), and wrote out Annabel's name on the stocking.