Showing posts with label green. Show all posts

Friday, July 13, 2012

Fun Friday Fascinations #13


#1. Concrete stamped to look like hardwood flooring!  Genius.  Found on The Lil' House That Could.

#2.  I love all the colors and patterns in this photo.  I want a funky chandelier in my bedroom!  Adds so much class to sleepy time.  Found on Better Homes & Gardens.  

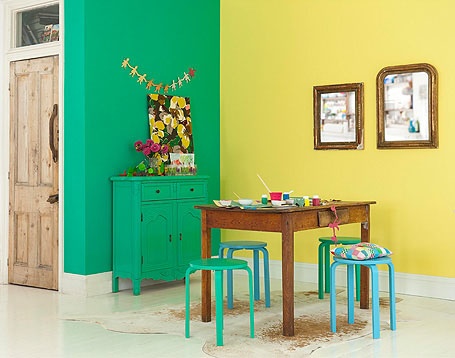
#3.  Looking for some painting inspiration, and I found this awesome photo.  Love everything about this colorful little nook.  Found on Sweet Peach.

#4.  More interior design inspiration, and a room that's perfect in every way.  Found on Modern Home Today.

#5.  We have a bunch of zucchini some friends grew, and I found this awesome recipe for Sauteed Zucchini on My Recipes.  You'll probably be seeing more zucchini here on Monday.  :)    

Hope ya'll had a great week!  Happy friday, and happy DIYing, chris.  

Saturday, March 17, 2012

A little green for the holiday ...

Happy St. Patrick's Day!  I'm not Irish or Catholic, so I don't do much for this holiday, but I do enjoy an excuse to wear bright green!  So I have another outfit post for today.  I know I've been doing a lot of post about myself lately, and not so much on the DIY front.  I guess I've just been inspired by the bloggers I've been following.  


Here are two more blogs I started following this week.  I found Diversions over on Elycia's blog.  I love Stef's style, great combination of colors and patterns!  Plus she always seems to have her nails painted and super cute rings on.  The other blog is Fine & Feathered, and I found Josie on craftgawker with her post about covering your lappy with contact paper.  She executed it perfectly, so I decided to poke around her blog some more, and I really enjoyed her other posts!  She has cute style, more muted colors and patterns than I usually go for, but she's so pretty and her photos are inspiring, and she has fun DIYs!  I'm excited to see what these two ladies put out there in the future.  


My Outfit:
headband -- from Target
sunglasses -- from Urban Outfitters
necklace -- from Urban Outfitters
sweater -- from T.J. Maxx
yellow & grey tank top -- from ModCloth
peach tank top -- H&M
pants -- Delia's
socks -- Target
shoes -- DIYed Dirty Laundry

Most of the photos my husband took, except for the close-ups I took those.  Hope ya'll enjoyed, and are being safe this holiday.  There is no rule that says you have to drink until you're green (or at all for that matter)!  Until tomorrow, happy DIYing, chris.

Wednesday, January 18, 2012

Painted Planter - Day 2

Day 2 of the painted planter!  The first step is to remove all the tape.  The planter I used was ceramic coated in a thick smooth glaze, so the latex paint didn't really bind with the surface of the pot.  In order to avoid all the paint peeling up with the tape, I first ran a razor over the edge, and I peeled the tape off slowly watching for any hang-ups.  Once the tape was pulled up I smoothed the edges with my fingers.  Then I painted over all the patches of paint with clear varnish, this will help keep the paint from peeling off in the future.  If you are using a clay pot you shouldn't have to do this.

Now on to the fun stuff!  Since it's cold outside, and there aren't very many hours of sunlight I used a large plastic tote to do this project indoors.  In the tote place a pot filled with plenty of fresh soil, the newly updated planter, and the plant you're transferring (my plant is a gerbera).  

Add about an inch or so of soil to the bottom of your planter, depending on the difference of size of the two planters.  Next, squeeze the bottom of your planter all around, you may need to go 'round multiply times.  This will loosen up the plant, so that you will be able to turn it upside down, and the plant should slide right out (even if it is absolutely root bound, like my plant).  

I would definitely suggest you transfer your plants before they become this root bound though.  I've had this plant since I got married on 4/16/2011.  We used gerberas as part of our centerpieces for our larger tables.  I honestly didn't think this plant would survive this long, so I never bothered to replant it.  It's a strong little sucker!  Keeps popping up flowers and growing more leaves, I couldn't be more proud. :)  

Now back to the task at hand!  Place your plant in the center of your pot.  Add soil around the edges, and don't compact the soil too densely.  It's important for there to be some air in the soil, so that the roots have an easier time pushing their way through.  You also want to be mindful not to fill the soil above the current or previous level.  

Once you are done filling the planter with fresh soil be sure to clean off any excess soil, and then water your plant.  

Look we even have a new flower starting!  

Happy DIYing!

Tuesday, January 17, 2012

Day 1 - Updating A Planter

Updating an old plant pot is today's Do It Yourself.   I have an orange planter that's been around for ages, and my gerbera is long overdue for a replanting.  However,  the flowers on the gerbera are orange, and though orange is one of my favorite colors I wanted to update the planter first.  

WHAT YOU'LL NEED:
- empty planter
- painter's tape (2 inch)
- two types of house paint
- straight razor

Directions:
I started off by taping off the bottom part of the pot.  I butted the tape up to the bottom edge of the planter.  I used small pieces all around the edge, because the curve of the planter didn't allow me to just wrap a single piece around the bottom.  Once I was done taping off the bottom, I had to use a straight razor, and make the top edge even all the way around.  

Then, I took four strips of tape, and placed them vertically, and evenly spaced around the pot.  Making sure to go over the edges of the tape; to ensure no paint will seep under them.

Now paint two sections one color, and then paint the other two sections and the bottom the other color.  Be careful to make smooth even strokes with your brush, so you don't have any streaks.  Since the tape is so wide you can hold the planter on the tape, and maneuver it around to paint every exposed spot.  I'm keeping the inside orange, so when painting the top edge make sure you paint doesn't drip down the inside.  

You may need to let it sit, and paint on a second coat.  Afterward, let the planter sit overnight before peeling the tape off.  


We will finish this project tomorrow!  Until then, happy DIYing!