Showing posts with label nail polish. Show all posts

Saturday, February 16, 2013

Thrifting and Nails


My husband and I save our change.  We keep vintage tins on our dresser for pennies, nickels, dimes, and quarters.  We'll save our change all year, or for two years until the penny jar fills up, because it's always the first to fill up.  Then when that day comes we roll up all our saved coinage, and exchange it for paper bills.  We usually end up with a nice little stash of cash.  Yesterday we decided that day had come, and set to work.  We came up with $113!!! With our new windfall we agreed it was high time we bought ourselves an actual coffee table.  We are currently using a trunk, and it would be nice to have something we could put our feet under.  Or even better yet a drawer we could hide our remotes in.  So today we went on a hunt for that perfect coffee table we've been dreaming of.  

I was hoping to be sharing our great find with ya'll today, but no such luck.  Darn!  We did check out some awesome antique/second-hand type stores, and though we didn't find a coffee table we did find a nightstand for Aaron.  We were really pleased with this find.  Now we can return the folding chair we were borrowing from my parents.  Though now I feel like we have to find Aaron a table lamp, and that wasn't previously on my Desired Furniture list for the house.  

The furniture hunting took up most of our day.  By the time we got home it was almost time for dinner, and Aaron and I have plans to go out tonight.  We are going to see The Spinto Band play at a bar in Philadelphia.  I went to college with a couple of the guys in the band, and I've seen them play a few times.  Their shows were always a blast, so when I heard they were having a record release show in Philly I knew I wanted to be there.  

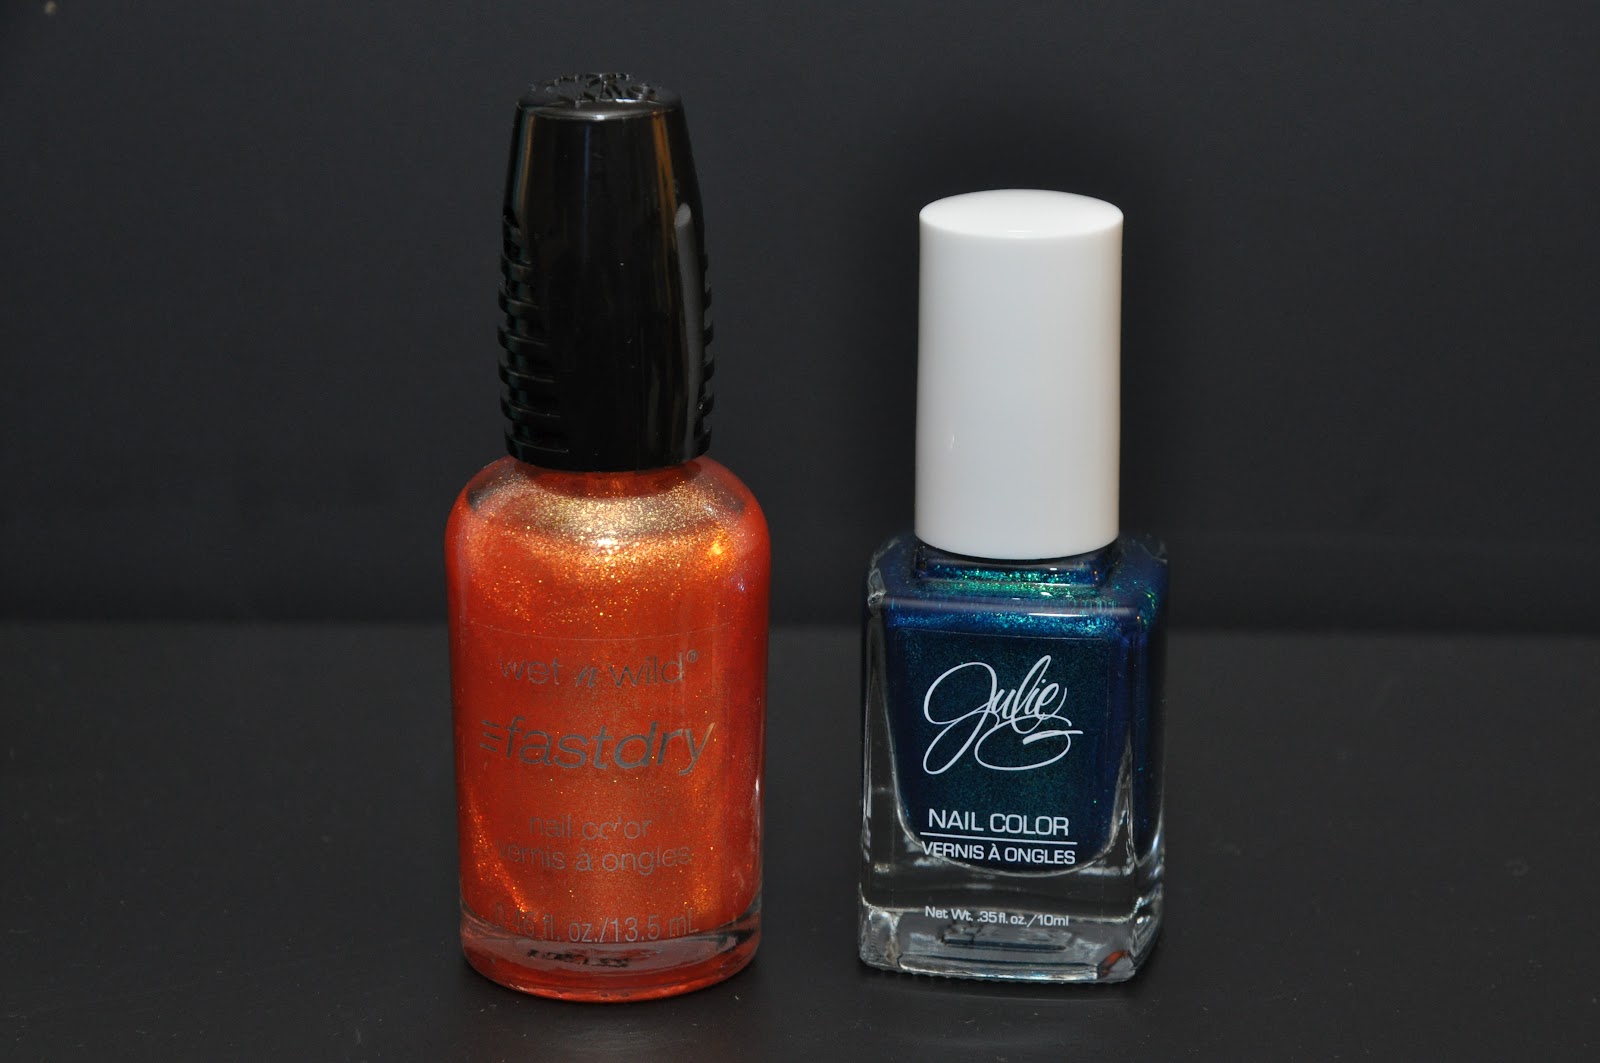
So when I got home today I decided it was a good idea to fix the nail polish paint job I did on Valentine's Day.  I didn't think it was completely awful.  I liked the color combo a lot, but the hearts were mega messy.  Actually when I pinned a photo from that post, I immediately got a wretched comment saying "there are some things we shouldn't try doing ourselves"!    I try not to let that sort of thing get to me, and I know that paint job wasn't my best work, but that comment hurt.  A lot.  Some people can be horrible, especially on the internet.  I know I'm no pro at painting my nails, but I'm trying, and practice makes perfect (or at least better).  So I'm thankful for those of you who stick by during my nail fails.  I hope to get better one day, but like they say you have to fail at something to get good at it.  


I used the same colors as the previous nail job.  Though I skipped using the markers, I think they bleed too easily.  I also used a little dry glitter and clear polish on the heart on my ring finger.  I need to buy a new nail art pen, I think the old one rain out of ink.  I want to try a different brand.  Do you use nail art pens, and have a brands you'd recommend?  I'd love to hear all about your favorite polishes!    

Have a great weekend, and happy DIYing, chris!

Sunday, January 27, 2013

Gradient Nails


Today I tried out The Nailasaurus' Gradient Nails tutorial.  I used Orly's Won't Chip for a top coat, Sally Hansen's Green With Envy for the second color, and Orly's Lemonade for the bottom coat.  I had to use two coats to get proper coverage with the yellow color.  One coat was almost thick enough though.  I painted all my nails with two coats of Lemonade. 

Then I mixed the green and yellow together on a paper plate using a paperclip, and then I used a kitchen sponge to dab the polish onto my fingers.  

I cleaned up the skin around my fingers with cotton swabs I dipped into polish remover.  I coated each nail with the clear top coat, which helped smooth out the sponge marks.  

I like this look, but it's not as refined as The Nailasaurus' paint job.  I'll have to try it out with other polishes, and sponges.  I need to buy more top coat, maybe I'll treat myself to a new color!  Hope ya'll had a great weekend, and happy DIYing, chris!

Wednesday, December 19, 2012

Christmas Nail Art


My work's Christmas party is on Friday, so I thought I'd paint my nails today.  Of course I turned to google to find my nailspiration.  I found a ton of great Christmas inspired nail art, but I'm not all that talented, so I went for the simplest (yet fun!) thing I could find.  I really enjoyed this paint job I found on Polishpedia.  

I don't own any of those colors though, well except for white.  So these are the colors I went with instead.  From left to right: Funky Fingers in Zeppelin, Ulta Nail Lacquer in white, Julie in Mermaid's Tail, and Orly's Won't Chip.  I used the first color as my base coat.  It took two coats to get proper coverage, but it dried quickly.  Then I used the white with a paperclip to make the "snowflakes".  I used the Mermaid's Tail to make my Christmas Tree.  My tree isn't as perfect as Polishpedia's, but it at least resembles a tree and not a dark teal blob.  I finished off with a topcoat of Orly's Won't Chip, which I've said before I never go without when painting my nails.  When they say won't chip, they mean it.  

This is how my left hand turned out.  Sorry it's slightly blurry.  Apparently my arm isn't quite long enough to hold in front of the camera and get sharp focus on my finger nails.  

Next time I'll have to remember to break out the tripod.  It can be such a hassle though.  I really need to buy a remote to make it a bit easier.  Anywho, that's all for today. Happy DIYing, chris!

Tuesday, November 27, 2012

Nail Art


Ick, long day.  I'm failing at words. So here.  Nail art.  


I used Sally Hansen's Xtreme Wear The Real Teal, Sally Hansen's Nail Art Pen in white, and of course Orly's Won't Chip clear top coat.  I could never paint my nails without using this top coat.  I feel like it would be a waste spending the time painting my nails if I didn't use this top coat.  My right hand doesn't look half as good as my left.  I need to work on becoming ambidextrous.  

Have a lovely night, and happy DIYing, chris!

Sunday, October 28, 2012

Halloween Nails


We got a ton of laundry done today.  Aaron and I bought a new microwave, and got it plug in ready to go.  We got some food shopping done.  Which was surprisingly not crazy.  I thought the super market would be overrun with people trying to prepare for the impending Stormtober.  They were low on a lot of things, but it was pretty much a regular sunday shopping trip.  We cooked breakfast for dinner, which was awesome.  I love having a big pancake, egg, and sausage dinner.  Then Aaron left for work, and I decided to paint my nails.  I was thinking Halloween, but I don't have any black nail polish, so I couldn't do any traditional themed halloween dos.  

I have a couple oranges, and I thought some greens would work nicely with the oranges for Halloween.  I also used my silver crackle nail polish over the green nail polishes.  For the spooky face I used a black sharpie to draw it on my nail once the orange had completely dried.  It smeared a bit when I painted on the clear top coat, but I think that kind of added to the creepiness.  Not the best manicure I've ever given myself, but it's fun for the upcoming holiday.  Though I'm worried that it will get rained out.  That would be so sad for Halloween to get cancelled due to lame weather.  

Hope things don't get too windy or wet here, and good luck and stay safe to anyone who will be encountering Hurricane Sandy over the next few days.  If you don't here from me, it's because I lost internet.  Happy DIYing, chris!

Sunday, September 30, 2012

Fall Inspired Nail-Do


We got back from Vermont today, and after nine hours in the car I just wanted to do something relaxing for my DIY.  I had painted my nails this orange color by Wet n Wild Fastdry for the wedding.  

So when I got home I taped some different designs on my nails, and painted a coat of this sparkly teal by Julie G.  

These are the polishes I used.  Wet n Wild's Fastdry 9.0.2.1. Orange, and Julie G's Mermaid's Tail.  The orange I painted on two coats, and the teal I only used one coat, but I'm certain if there wasn't already a base coat I would have needed to use two.  They both dry fast, and have really pretty sparkles in them.  I'm totally please with these two new nail polishes.  

Hope ya'll have a great day, and happy DIYing, chris! 

Sunday, August 19, 2012

Pink and Orange Polka Dot Nail-Do


I have another nail-do for ya'll today.  Sundays seem to be my nail day.  I try to shellack my nails in enough clear coat to keep them chip-free through out the week.  By sunday I'm over the paint job, and my nails are do for a trim, or at least a good rub down with an emery board.  After I cleaned off last week's nail polish my nails were stained from the dark teal nail polish.  I was able to easily remove the color by simply buffing my nails.  To balance out the dark bold look of last weeks design, I went with a light girlie design for this week.  

A light pink base coat with a bright orange and pink polka dot design.  The light pink works perfectly with my bright colors, and polka dots couldn't be a more perfect design to accentuate how well these colors work together.  

I used Sally Hansen's Xtreme Wear in Bubblegum Pink and Sun Kissed for the polka dots, and Ulta's Encore Pink for my base coat.  I topped the whole design with two layers of Orly's clear Won't Chip polish.  Clear polish is a must for all my nail-dos.  It's the only way to keep my cute designs chip free for more than a day.  

Well I need to finish my right hand before it gets too late.  Hope ya'll had a fantastic weekend, and happy DIYing, chris.  

Sunday, August 12, 2012

Sun Kissed Nails


Aaron and I worked at the house from nine to three.  Then we came home and watched The Guard together.  Amazing movie, my type of film.  Extra dry and absolutely gorgeous cinematography.  While we were lounging around I painted my nails.  Then Aaron left for work around six thirty, and I didn't realize I had left my camera in our car.  So I decided to try to use my cell phone to take some photos of my nail-do.  

I painted my nails with the teal color first.  Then I tore off nail sized pieces of blue tape for each finger, and cut an upside down 'v' shape out of the middle of each piece.  I carefully placed a triangle on the bottom of each nail, and placed the other half on the top half of my nail.  Leaving an upside down 'v' exposed.  I painted that part of my nail orange.  Let the paint dry, and then removed the tape. 

On my ring finger I painted some glitter nail polish, then painted a clear top coat on everything.  I used Sally Hansen's Xtreme Wear line of nail polishes, The Real Teal, Sun Kissed, Disco Ball, and Invisible.  I want to buy some of those nail sticker stencils.  They would work a ton better then the crap ones I make with blue tape.  I get so impatient waiting for my nails to dry, and I usually end up damaging the paint trying to tear off the tape.  

Hope ya'll had a great weekend, and happy DIYing, chris!  

Saturday, April 21, 2012

Wedding Anniversary Present


This is the outfit I got as a present for our one year wedding anniversary.  I wore it on Tuesday, it was super hot here in Delaware.  For this Saturday Blogger Love I wanted to try out Diversions' technique with cloning myself in an outfit pic.  I couldn't be more thrilled with the results.  It was way easy to do too!  I took my outfit pics with a tripod and self-timer as usual.  This time I tried to move around the frame and pose myself differently in each photo I planned on layering together.  In GIMP I layered all the photos together.  Erased the parts of the top layers that covered me up in the lower layers, and then there were four of me!  This photo definitely reflects my current mood.  I've been feeling cut adrift.  Caught in this strange dream space.  I want to do this cloning thing again!  Thanks Diversions!  

I bought this dress at a cute little local store at the Rehoboth Beach, called Super Kind. Which is where Aaron and I went for our anniversary.  I'll share some photos from our little beach adventure tomorrow. I love the colors and the pattern on the dress.  There is a silk slip attached as the bottom layer, and it makes me feel so girlie and pretty.   You can also see our two raised 4x4 garden beds.  The bed closest to the camera has four tomato plants, a Pink Ponderosa, Anise Noire, Cherokee Purple, and Riesentraube.   The back bed has a couple varieties of lettuce, some spinach, some chard, a Red Rock Mammoth Cabbage, and a broccoli plant.  

I love all the pretty flowers that are blooming right now.  It smells so good walking and driving around.  I love the smell of gardenias, and I can't wait until the honeysuckle starts!  

Love these colors together.  They matched perfectly with my dress, and I didn't even plan it!  

I usually hate photos of feet.  I'm not a foot person, but I had to show off how I painted my toe nails the color of the dots on my finger nails.  I love the feeling of grass or moss under my feet.  

One last photo of my nails, don't mind how awkwardly posed my hand is.  You can see my completed friendship bracelet in this photo.  I braided the end, and added some beads to finish it off.  Totally love it!  Hope ya'll are having a great weekend!  Happy DIYing, chris! 

Wednesday, March 28, 2012

A New Attempt at a Nail-Do

A while back I said I wouldn't post another nail-do post.  I tend to have a lot more frustrations with painting my nails, than I have successes.  However, today I was actually successful in pulling off a really cute paint job on my nails!  

I'm totally loving this look!  I didn't even realize when I got dressed in the dark at five this morning I picked out an outfit that matched my nails perfectly.  My sweater matched the bottom coat which is Sally Hansen's Mint Xtreme wear nail polish.  

You can't see in these photos, but I have a tank top on that matches the triangles (Sally's The Real Teal).  I made the triangles with masking tape.  I finally learned that it is completely essential that your bottom coat of paint be dry before applying the tape.  It may even be wise to just paint your nails a solid color and go for that look for a day, and then add the triangles later.  You could even use the triangles to give new life to old chipping nail-dos.  

I made the pink dots with Sally's Bubblegum Pink, which was perfect with my work polo.  I dabbed the nail paint brush on a piece of junk mail, then I dipped a paper clip into the wet paint splotch, and used that to apply the pink to my nails.  Super simple, even I could pull this off!  I love these colors together, I'm so glad I bought these.  Maybe one day I buy grown up nail polish from Ulta, like some China glaze ... 

or maybe this Butter stuff. :)  

Well hope ya'll enjoyed.  I have a super long day tomorrow.  Not sure how much I will feel like posting when I get home.  Until then, happy DIYing, chris!  

P.S.  If you want better instructions on how to paint triangles on your nails, check out this post Dainty Squid did a while back.  I found it while I was trying to get some nail photo inspiration.  

Monday, January 16, 2012

Green Multi Nail Job!

Today was not a great day, and I didn't get half as much done as I would have liked.  I barely got my DIY done today.  I attempted to paint my nails.  I was inspired by this lovely nail job by Cupcakes and Cashmere.

I started out with a base coat of Sally Hansen's Mint color on my thumb, index, and pinky nails.  A base coat of Sally Hansen's Green With Envy color on my middle finger.  

Then I painted a clear coat on my ring finger, and quickly dusted it with Martha Stewart's Mint glitter over a paper plate.  I knocked off any excess, and painted a few clear coats over the top.  

Then using a white nail pen I drew lines on my pinky finger.

Once, the paint dried on my thumb and middle fingers I put a piece of blue painter's tape half way over them.  Then, with the opposite color of what I had painted each nail I painted one side of my thumb and middle fingers.   


Now this is where I messed up, the painted hadn't fully dried on the base coats or on the new layer of paint when I tired to peel it up, and up with the tape went my new paint job.  So I used some nail polish remover on those nails, and skipped the tape this time around.


Here's hoping you have better luck with this!  Happy DIYing!