Showing posts with label paper. Show all posts

Sunday, September 2, 2012

August/September Days


At the beginning of the year I made a monthly calendar by hand, and each month I've been adding stamps and drawings for the big events that happen.

Here is August, a butterfly made out of different scraps of fancy paper.  For June, July, and August I went with a Hungry Caterpillar theme.  June was the caterpillar, July was the cocoon, and August was the butterfly.  

In the beginning of the month we went up to New York for our friend Derick's bachelor party.  My mom's sister Lynn had a birthday, and I totally failed to call her to wish her a happy birthday. Boo me!!!  I hope she had a lovely day!  

When I flipped over to September I was really pleased.  I forgot what I had drawn, and it's way cooler than what we've been staring at for the last month.  I'm beyond over the butterfly I made for August.  

This month is going to be another busy one.  We have two weddings to go to.  The first one is Aaron's cousin's wedding, and we'll be traveling down to D.C. for the day to celebrate with his family.  At the end of the month we have Aaron's best buddy Derick's wedding.  Aaron is in this wedding, and it's all the way at the tippy top of Vermont, so it will be a long weekend of celebrating.  We can't wait!  :)  

I was busy all day with the house, and getting ready for tomorrow's festivities, and I'm beat!  Hope ya'll have a great day, and happy DIYing, chris!  

Thursday, May 3, 2012

Handmade Card


Trying to stick to my goal this month on posting more DIYs, so here is the birthday card (with envelope!) I made for Aaron.  I've made a variation of this before.  I got the idea from The Ultimate Cardmaker, which is a fantastic book on card making.  If you have any interest in cardmaking this book is a must buy.  This book will generate enough inspiration for years and years of card making.  

The book suggest using teabag folding papers.  I had never heard of that type of paper the first time I made this card.  Of course I googled it, and so I decided to cut origami paper into 1.5 inch squares.  
Step 1:  Cut origami paper into 1.5 inch squares.  You'll need 7.  
Step 2:  Fold the squares in half both ways.
Step 3:  Fold the squares on their diagonal.  
Step 4:  Pinch the middle in, and flatten into a triangle.  
Step 5:  On one side fold the the triangle arms under, making a square in the middle.  On the other side fold the tips that are sticking out back.
Step 6:  Make seven of these little guys.  For some reason only six made it into this photo ... opps.  
Step 7:  Now start attaching the seven squares together.  Begin by folding half of the top square back, and apply a quick drying glue.  Weave the next piece in by placing the triangle flap over your glue splotch, and press the top flap over the piece you placed over the glue.  
Step 8:  Keep repeating this process.  I found it was best to layer moving in a counterclockwise motion.  
Step 9: This is what it should look like before you slip in the last piece.  
Step 10:  Place the last piece the same way you did the other pieces, and then glue the other side in, but layer on top of the first piece.  
Glue the paper medallion down on a long card.  I made my card by folding some handmade paper in half, and taking a couple inches off the bottom.  I glued some twine and yarn under the bottom to make it kind of look like an award.  In the book they use ribbons, and I did that the first time I tried this, and it looked awesome too.  
When all the ribbons or string/twine are in place hot glue a button to the center.  Now you're card is complete.  I stamped 'happy birthday' across the top, and wrote a little love note on the inside.  

Now for making an envelope.  Once you learn this technique you can make an envelope for any handmade card, no template necessary.  
Step 1: Get a piece of scrapbook paper, and trace the card in the center of the paper.
Step 2:  Measure the width of your card, divide that number in half and then add a half inch.  Measure that distance away from the long outside edge.  Draw a line, and then using our ruler angle in from the corners.  For the short ends, measure 2.5 inches up, and draw a line, and then angle in from the corners again.  
Step 3:  Cut the envelope out.  If you wanted to line the inside of the envelope now would be the time.  
Step 4:  Place the card face down over the center, and fold the bottom flap up.
Step 5:  Fold the sides in.
Step 6:  Run a line of glue down both edges of the bottom flap, and smooth the side flaps down.  Then add a line of glue to the right side flap edge, and smooth the left flap over it.  
Step 7:  Now glue the top flap down.  You could also use a sticker to close it, or if you are into wax seals that would be super awesome.  
Step 8:  Finish off by stamping 'happy birthday' on the front of the envelope.  Now you're done!  

Hope ya'll liked this DIY, and happy DIYing, chris.

Sunday, April 15, 2012

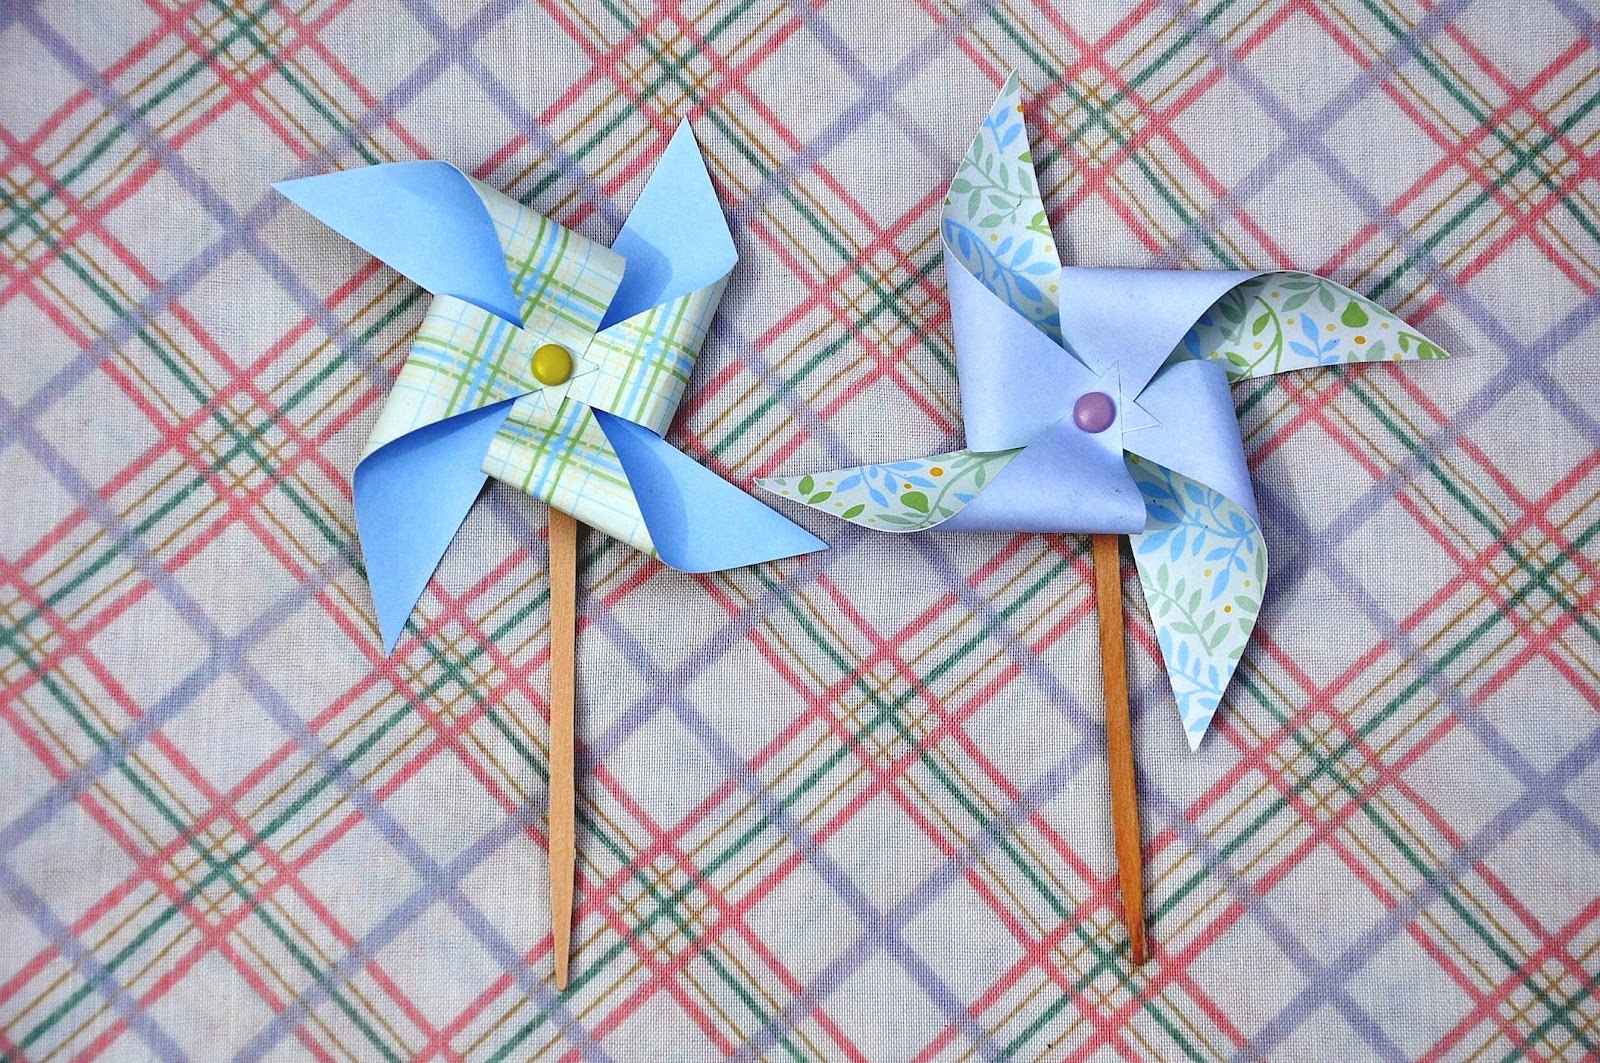
Pinwheels!


I told ya'll I'd make a post about how to make the pinwheel cupcake toppers you could barely see in my update about wedding cupcake toppers.  Well here it is!  

Start with a bunch of double sided card stock.  I bought these at Michael's, it's a Martha Stewart product.  I cut them down with my paper cutter to just under three inches.  You can play with how large or small you'd like them to be.  I found this was a good size for cupcake toppers.  You could even go down to 2.5 inches, but I find it gets harder any smaller than that.  

Now, lightly draw a line in pencil from each corner making a cross.  You will want to erase this line later, so don't press too hard.  

Next, poke a hole in the center, and one corner on each triangle.  Be consistent with where you place your holes.  Either on every right corner on the triangles, or every left corner.  After you've poked all your holes, cut on each line you drew.  Leave a quarter inch of paper uncut from the center on each line.  Now carefully erase your lines, try not to rip your paper.  

Turn a corner with a hole over, and stick a brad through the first triangle.  I also bought the brads at Michael's.  Then working clockwise slip the next corner with a hole on the brad.  Keep going until you have all four corners on, then lower the brad through the center hole, and flatten the metal flaps across the back.  

Now, you are ready to hot glue the pinwheel on the wooden stick.  I used Woodsies, i think I bought these at Michael's too.  Use a small dab, and carefully place it down.  It wont be able to spin, but it's super cute, and extra easy to make this way.  

Once they are dry you can stick them in your plants or in cupcakes.  I have one in my pen cup to add some whimsy to my boring office pens.  Heck, you could skip hot gluing it to a stick, and glue it to a headband, or hair clip, and BAM! you'd have a cute hair accessory!  I love DIYs that have many uses!  Happy DIYing, chris.  

Thursday, April 5, 2012

Wedding Stationary


To continue my One Year Anniversary Series here are the save the date and wedding invitations I made up for our special day.  

I made the envelopes out of scrapbook paper, which I got on sale from Michael's.  I have a DIY tutorial on how to make envelopes here, and I used a similar technique for my save the dates.  For the actual save the dates, I had previously made a bunch of post cards out of old wallpaper and 4x5 index cards, and they were just sitting in a box, so I used them for our wedding.  It was great to save money here.  We spent more on postage for these than on the actual save the dates!  To customize the cards I printed our save the date message on them, and then modge podged some tissue flowers from vintage napkins I'd been saving.  

To write the recipients' name and addresses on the front, I carefully placed blank address labels, and then hand addressed them all.  I loved finding a purpose for the 4x5 postcards I made.  This was the perfect match, because I received this paper during our summer at Idyllwild from my friend Rachel.  She had to clean out the painting teacher's supply closet, and there was a slew of wallpaper sample books from the 70's.  She gave me some, and I was thrilled.  I cherish vintage paper.  


For our wedding invites we used two different packaged DIY invites from Michael's wedding selection.  I loved the colors and design of both of these.  They were simple to use, and on sale!  I'm glad I went this route for my invites.  I think if I tried more of a handmade approach than these, I would have spent even more money and time on these then I did.  I'm certain there are not cheaper options as far as store bought goes.  Weddings are so expensive, and I didn't see the need to spend a ton of money on something most people will throw away.  Sure the invites set the mood for the wedding, but there is no need to spend hundreds of dollars on all the wedding stationary.  Most people will barely remember what the invites looked like by the date of the wedding anyway!  

That's all for today.  Hope ya'll enjoyed, happy DIYing, chris!  

Thursday, March 15, 2012

Painted Wooden Frame

The weather has been great here.  The past few days have been sunny and in the mid 60ºs (F)!  I can't believe it's only March!  Last year at this time it was cold and rainy in Delaware.  With all this great weather I wanted to do something outside, and spray painting sounded like the perfect DIY for today.  I've had this cheap wooden frame floating around for a few years.  So today I finally decided to give it a coat of paint to spruce it up a bit.  

I turned this plain wooden frame into this lovely painted frame!

What I used for this project was a large drop cloth, a cheap wooden frame, a sheet of medium grit sandpaper, rubber gloves, spray paint, and a moist towel.  

Begin by lightly sanding the frame.  I used a medium weight sandpaper for this project.  This will help the paint bind to the wood, and hopefully prevent future chipping.  

Next, wipe down the frame with a moist towel to remove all the dust bits you've just created.  

Now you are ready to spray the frame (as long as the frame isn't still wet).  Make sure to follow the directions on your spray paint can.  I like to use rubber gloves so that the spray paint doesn't get all over my fingers.  Spray your frame from every angle you can comfortably (and safely) maneuver around it.   Spray the back first, and then let the frame dry for about an hour or two.  Once the frame is not tacky to touch you can turn it over and spray the back.  

When the frame is completely done drying you can put a piece of art or a family photo in it.  I framed a handmade piece of paper.  I embossed this paper with two lace dollies when I was drying it.  To complete this piece I used some acrylic paint to color in the dollies.  I love the color of the frame with this handmade paper piece I created.  I used cardboard to back my paper, because I like how it complements the edges and color of my handmade paper.  

Hope ya'll enjoyed today's project.  Is it unusually warm where you live?  Does the sun get you out of the house with your DIY projects?  Happy DIYing, chris!

Friday, March 9, 2012

Printmaking from my College Days

For this week's Flasback Friday I want to share some of my prints from my college days.  

This I made with rose petals, coins, and paper clips.
Those lead to this type of lino print.  


I love my dollie prints.

this is a lithography print

This is a lino block print, with pen over the top.
Hope you enjoyed my prints.  Happy DIYing, chris.

Wednesday, March 7, 2012

Oh Happy Day

I'm tired, so I'm going to post about my blogger-love post from the past saturday, that I didn't get a chance to put up.  I borrowed Oh Happy Day's elephant Valentine's Day card and envelop idea.  I love cutout cards, and her elephant is just the cutest thing!  Plus I have some plain orange envelopes I'd like to jazz up.  

I began by trying to stamp an envelope that I already had.  This first attempt smudged.  I have this trouble with this particular ink pad a lot, I'm not sure why I keep trying to use it.  

To make my elephant template I cut a piece of notecard the same size the envelope.  Then I drew an elephant on it like Oh Happy Day's, and then cut it out.  I then picked out a piece of handmade paper to use for the actual card.  I traced my template and cut out the elephant.  I used an awl to make the eye hole, and a razor blade to cut out the ear.  I curled the ear around a pencil to give it some shape.    

Then I stamped 'happy birthday' on it.

This is how the envelope and elephant look together.


This is what I wrote on the back.  Thought it was cute for a belated birthday card.  Hope ya'll enjoyed, happy DIYing! chris.

EDIT: I was extra tired when I first wrote this.   I even spelled my name wrong!  I went back and fixed all my spelling errors, and added a little more detail.  

Saturday, March 3, 2012

Hammerhead Print

I want to begin by wishing Jessica (my sister-in-law) a Happy Birthday!!!  

I also finished my hammerhead lino cut this morning.  I also found my old stencil to compare it to.  

In the afternoon I printed my linoleum block.  I used a sheet of glass to roll out some white paint on, and I used a 3.5 inch brayer to roll the ink onto the hammerhead.  I used a piece of paper I had been storing since my college days.  It has photo chemicals smeared on the surface!

Then I used my small press to print the block.  I laid the paper down, and then I placed the block on top the the paper.  I centered the block under the center of the press, and then cracked the pressure.  

This is how he turned out!  I love the ghostly unevenness to the print.  

Next I used a straw to add some bubbles floating up from the hammerhead.

To complete it I made smaller dots with the back end of a cheap plastic paint brush around the large dots.  

I was going to do my Saturday Blogger Love post today too, but it's already eight in the evening, so I might skip it this week.  I'm pretty sure that only means that next week I'll do two blogger appreciation posts!  Can't wait, I've got some great ideas planned for this coming week!  I'm sticking to making some soap tomorrow.  I've been looking forward to this project all week!  Until then, happy DIYing, chris!

Thursday, March 1, 2012

February in Numbers

I have a confession to make ...  when I made up my planner for this week I kept today as a surprise, because I knew I would be too tired to do much of anything when I got home from work today.  I did manage to put together My Month In Numbers for February.  Remember I got this idea last month from Notes On Paper.


I worked 15 days this month, which resulted in me driving 614 miles, to travel to 10 different schools, and to take 1333 different children's pictures.  I actually took more pictures than that, but I wasn't able to count each day, because I was doubled up on a camera for a couple days.  

I made 29 blog posts, which resulted in 23 completed DIYs, 5 post were food related, and 4 were paper related.

I spent 5 dollars on my blog this month.  Actually my husband bought me extra storage space for my blogger account.  What an awesome husband he is!

All of my hard work on here has resulted in 868 BLOG VISITS (well since I add on google analytics) and 4 new followers!!! Those numbers are super encouraging and exciting!!  Thank you everyone who started following my blog!  

It's getting late, and I have to work tomorrow.  I need to get ready for bed.  Goodnight, and happy DIYing, chris.  

Wednesday, February 29, 2012

February Wrap Up & Seedling Update

Happy Leap Day!  I'm sorry I didn't plan any awesome Leap Day DIYs!  I love The Dainty Squid's jumping photos!  I want to share photos of my seedling's progress in their paper pulp cups.  I made seed cups out of paper pulp in muffin tins at the end of January.  

This is how the cups looked fresh out of the oven (right), and this is how they look with tomatoes, and broccoli, and cabbage growing in them.  

This is what my little indoor garden currently looks like.  

Now for my February Recap! I completed 23 projects this month.  Here are a few of my favorites.  
I love the Kitten Shelf I made for my cutie Cricket Chicken.  I also made her a cat hat!


Replanted Cacti together.  Besides the seeds I started I only did one other gardening project this month.  I planted a bit of a ginger root that was growing in my kitchen.  
I cooked up some yummy Chili, cereal killer cookies, and root veggie soup.  I also shared how to store your unused cilantro, and some of my cute bento-inspired lunches.
This is the Valentine's Day Card I made for my husband.  My other Valentine's Day inspired crafts included a heart stick coaster, and 52 Date Idea Cards.
I did a series on Paper Making, with pulp ideasdrying techniques, and what to do with all that handmade paper.
 I made some earrings out of yarn, and another pair with Mardi Gras beads.    I also used the fun yarn to make pencil toppers.
I drew on this clipboard, made a blog planner, and jazzed up a large candle.  I also made an owl birthday card!
Happy Leap Day Blog People!  For the love of blogs I made my first outfit post inspired by some lovely blogging ladies out there.  ((I need to add more to my ever growing bloglovin' list!))

Hope ya'll enjoy! Happy DIYing, chris.